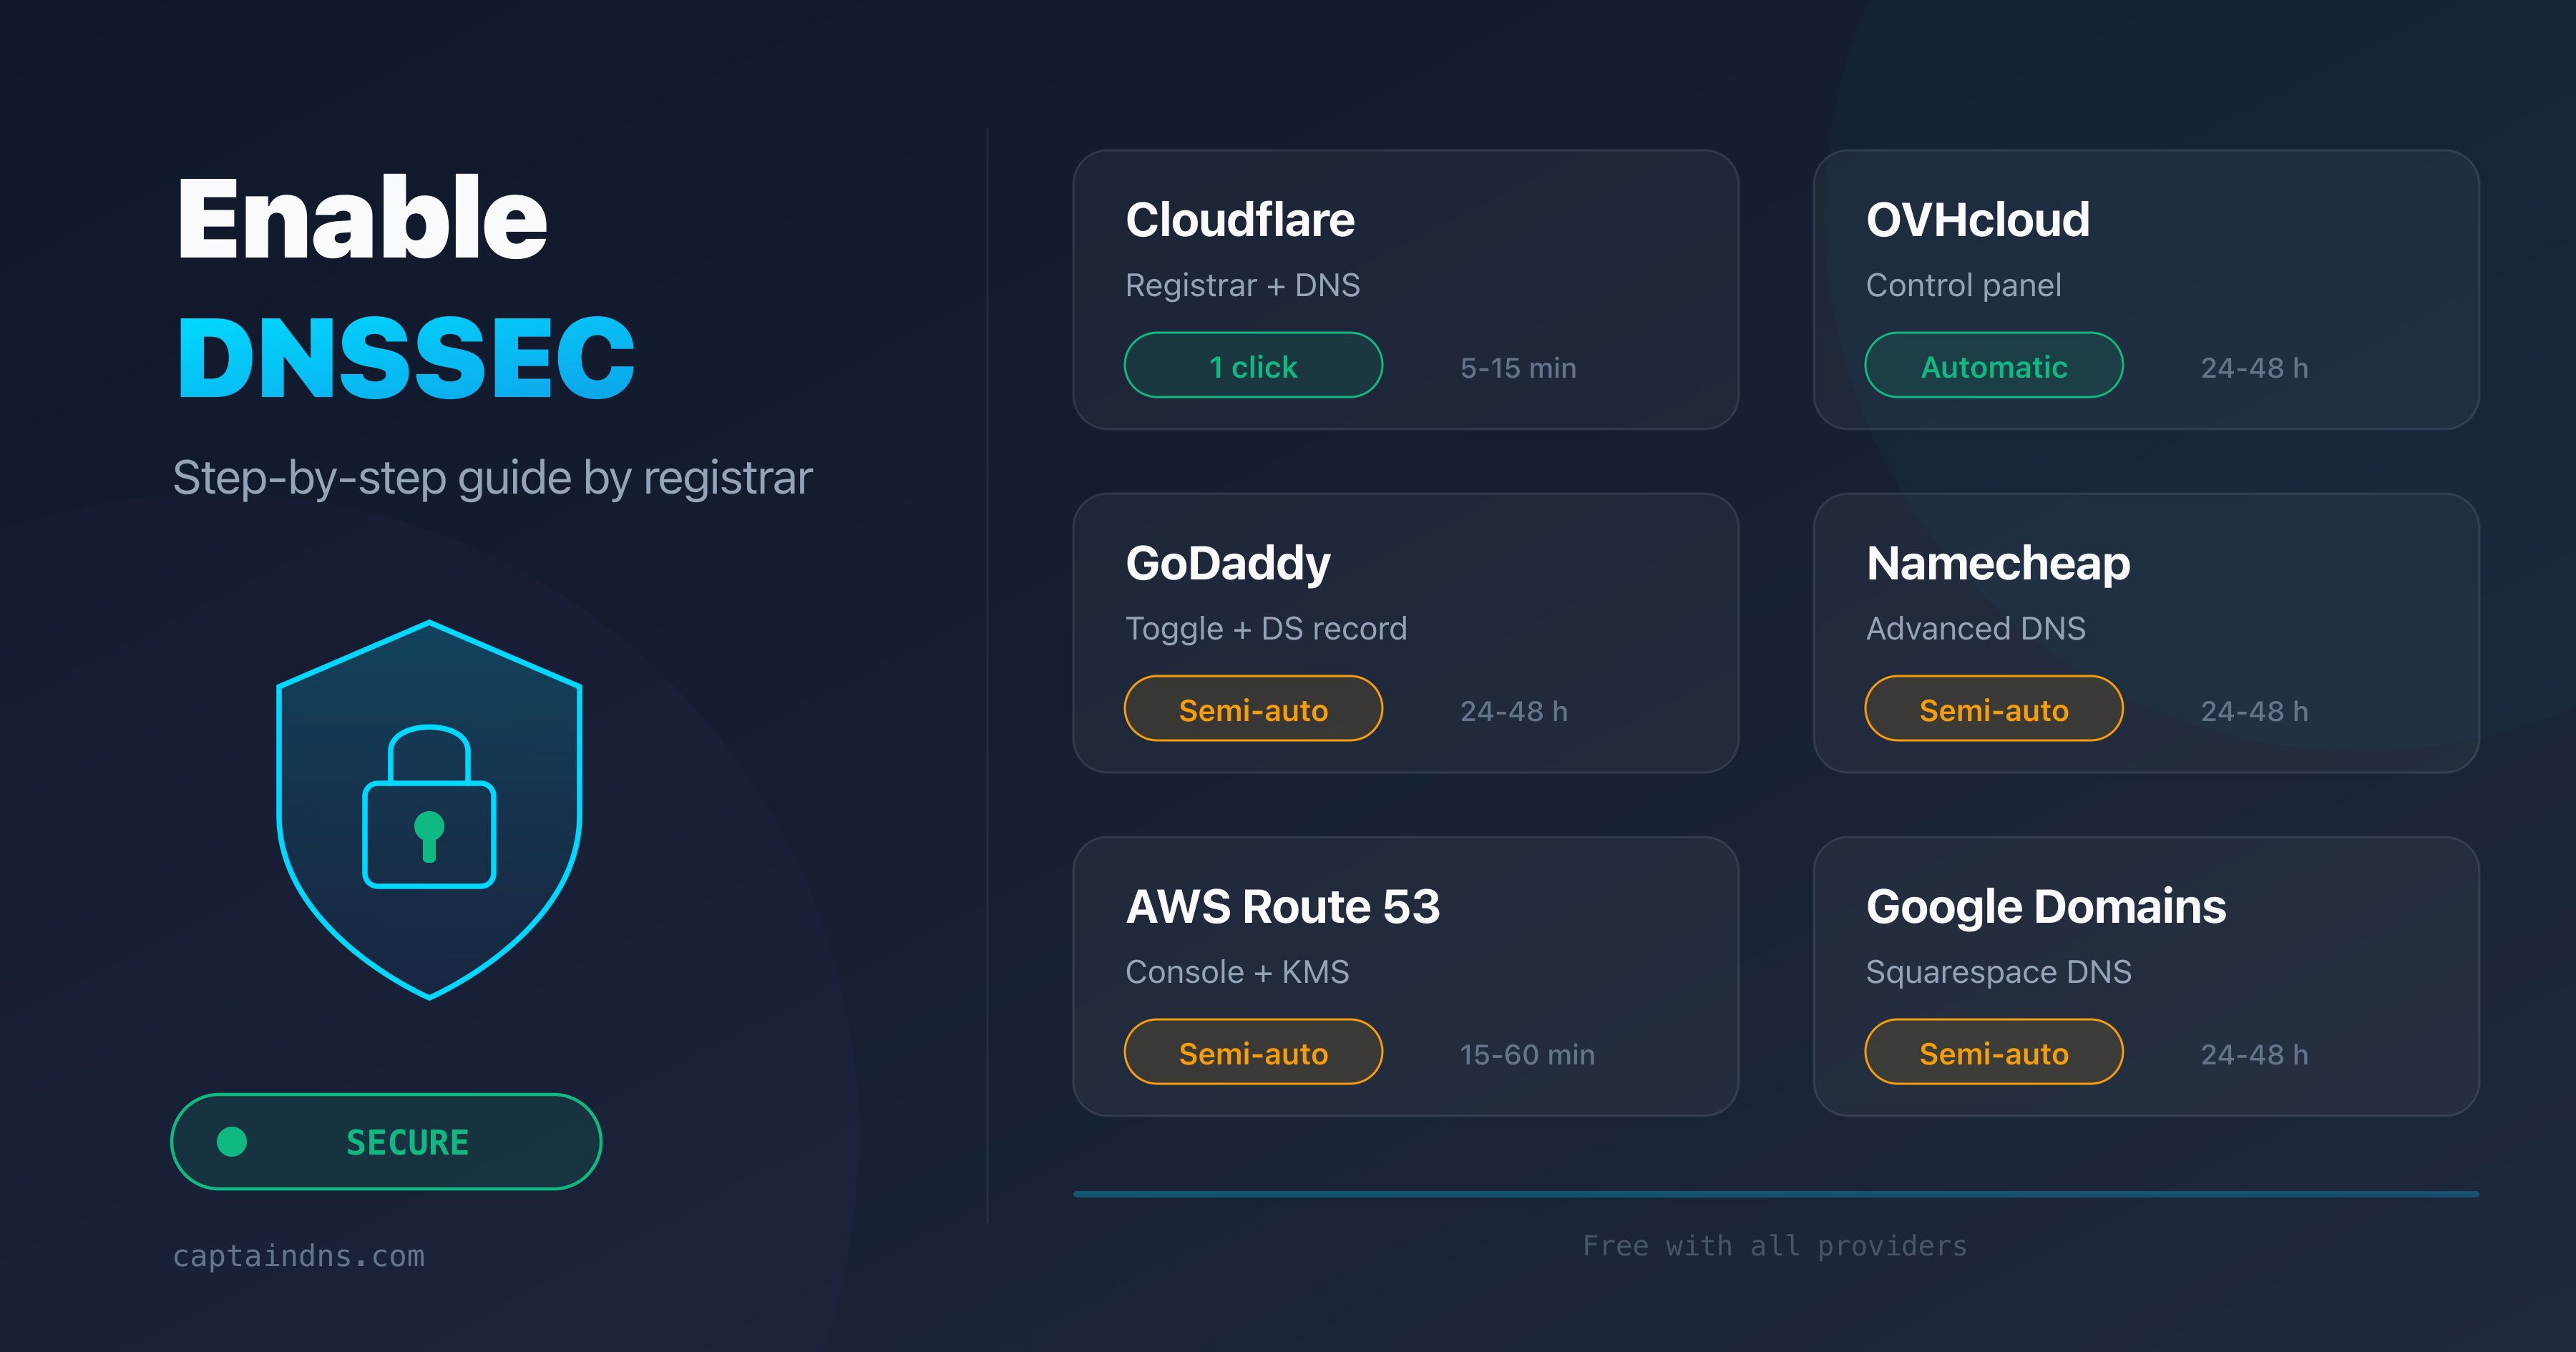
Enable DNSSEC: step-by-step guide by registrar
By CaptainDNS
Published on February 21, 2026
- DNSSEC protects your visitors from DNS spoofing by cryptographically signing every DNS response
- Activation involves two steps: enable zone signing with your DNS provider, then add the DS record at your registrar
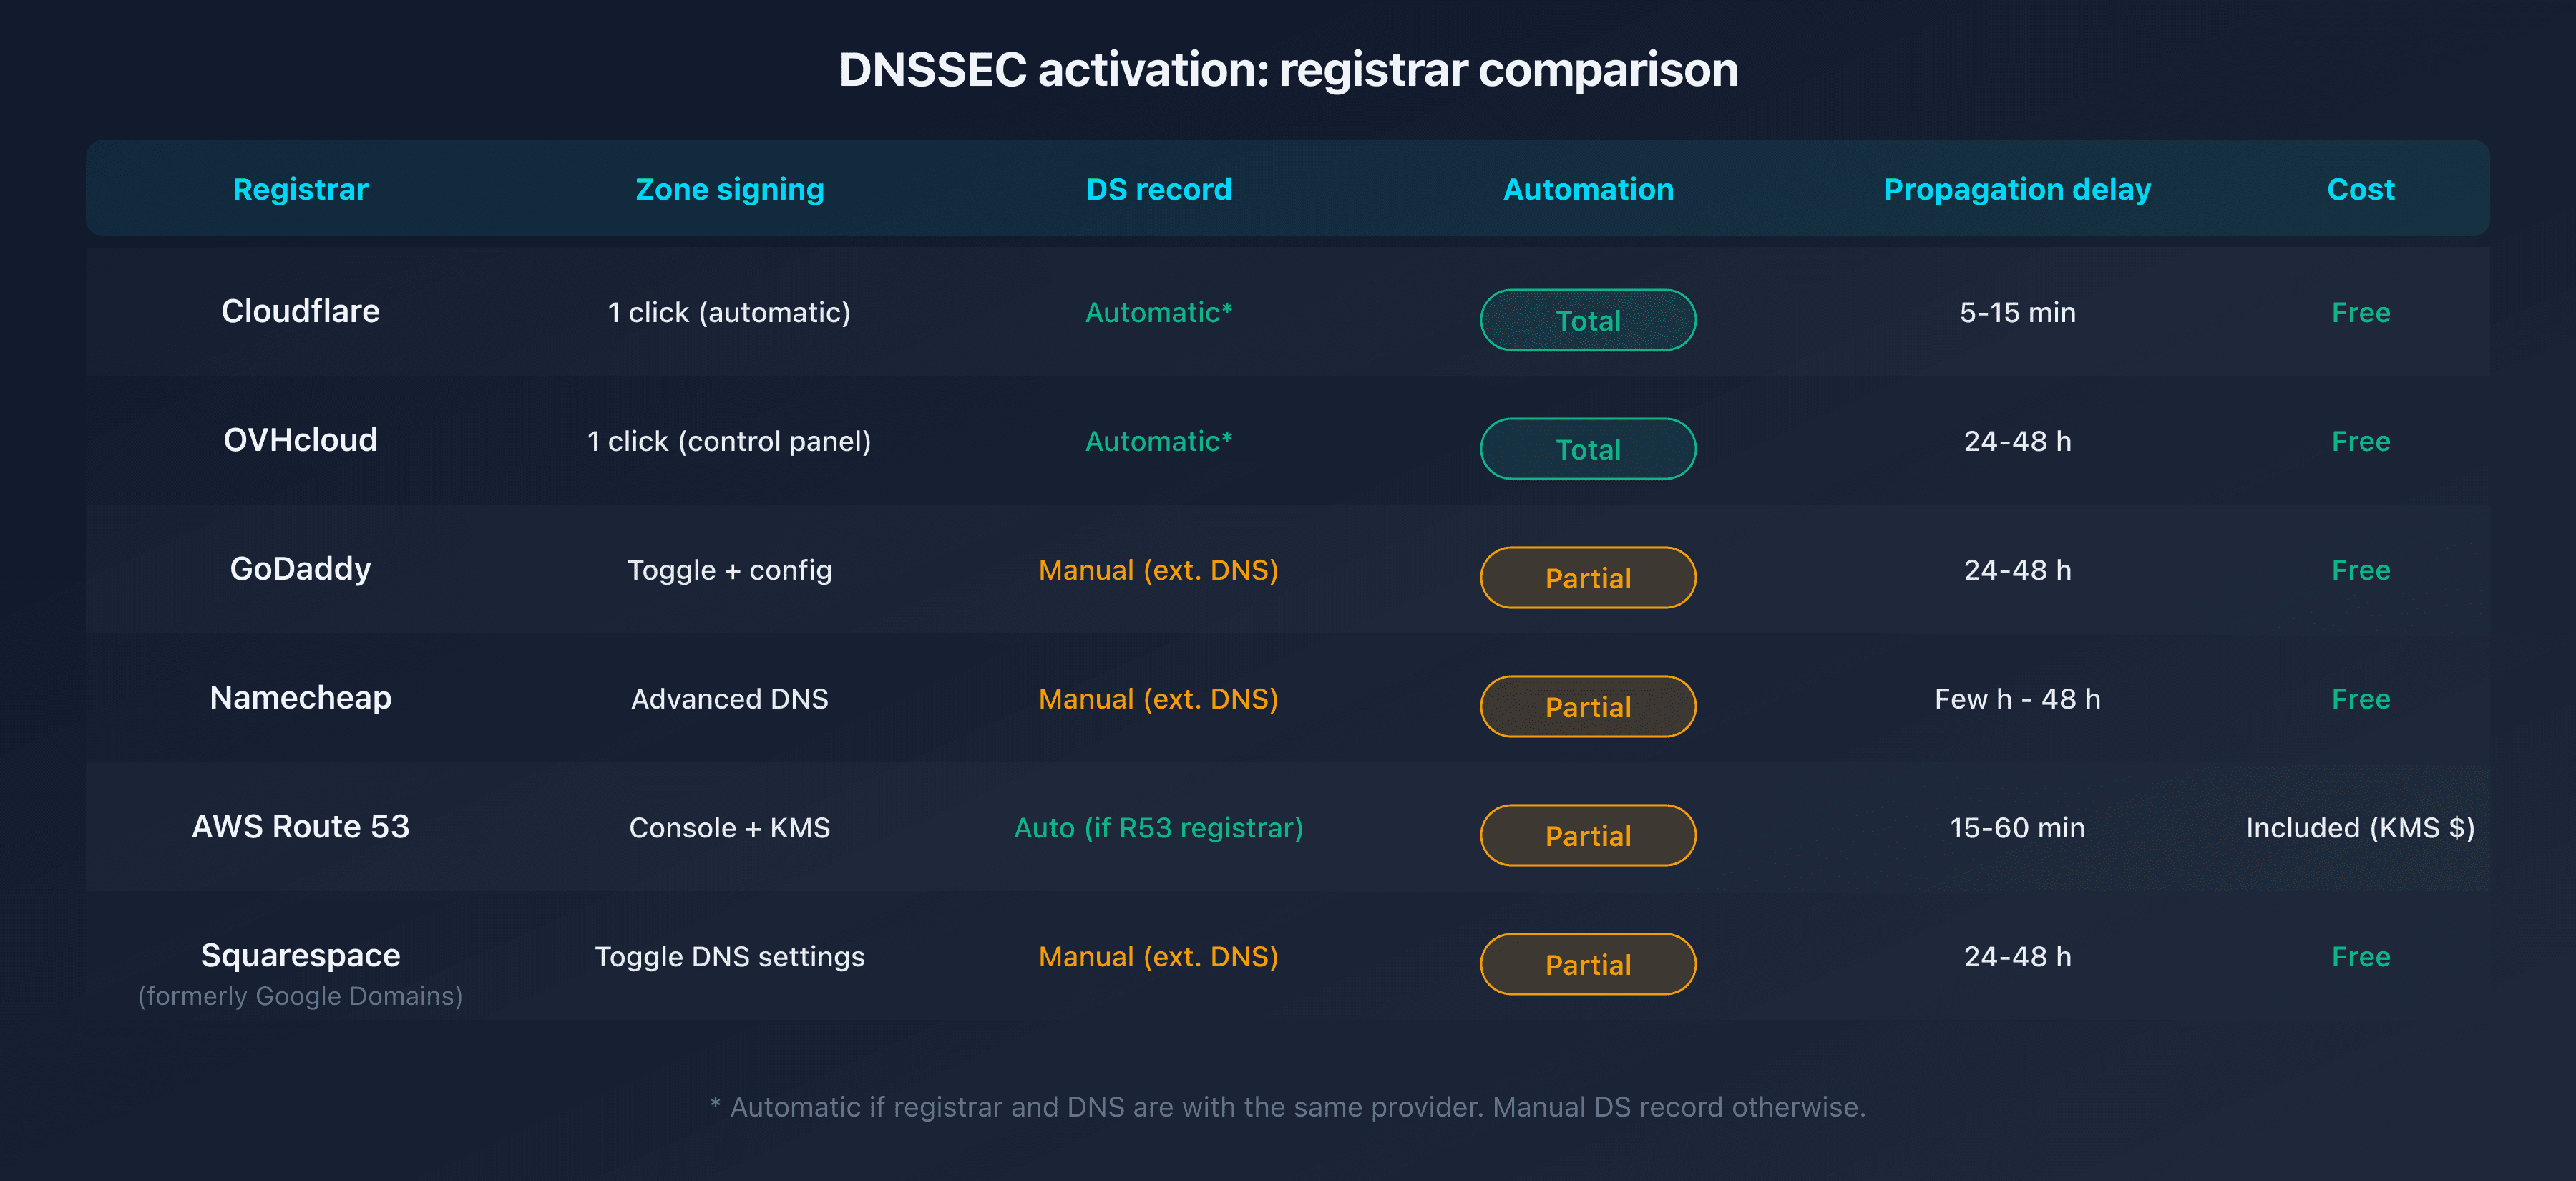
- This guide covers Cloudflare, OVHcloud, GoDaddy, Namecheap, AWS Route 53, and Google Domains with exact steps
- Verify your configuration in seconds with our DNSSEC Checker
What if an attacker could silently redirect your visitors to a fake version of your site? With plain DNS, they can.
DNS was designed in 1983 without any authentication mechanism. A resolver cannot verify that a response comes from the legitimate server. Attackers exploit this gap to inject forged answers and hijack traffic. This is DNS spoofing.
DNSSEC (DNS Security Extensions) solves this problem. It adds cryptographic signatures to every DNS record. Resolvers verify those signatures before accepting a response. If the signature is invalid, the response is rejected.
Despite its importance, DNSSEC remains under-deployed. According to APNIC, only about 38% of domains validate DNSSEC in 2026. The main barrier: activation steps differ across registrars and DNS providers. This guide walks you through the exact process for the six most popular providers.
How does DNSSEC work (in brief)?
DNSSEC relies on asymmetric cryptography. Your DNS provider generates two key pairs for each zone:
- ZSK (Zone Signing Key): signs every DNS record in your zone (A, MX, TXT, etc.) and produces RRSIG records
- KSK (Key Signing Key): signs the ZSK itself and produces the DNSKEY published in your zone
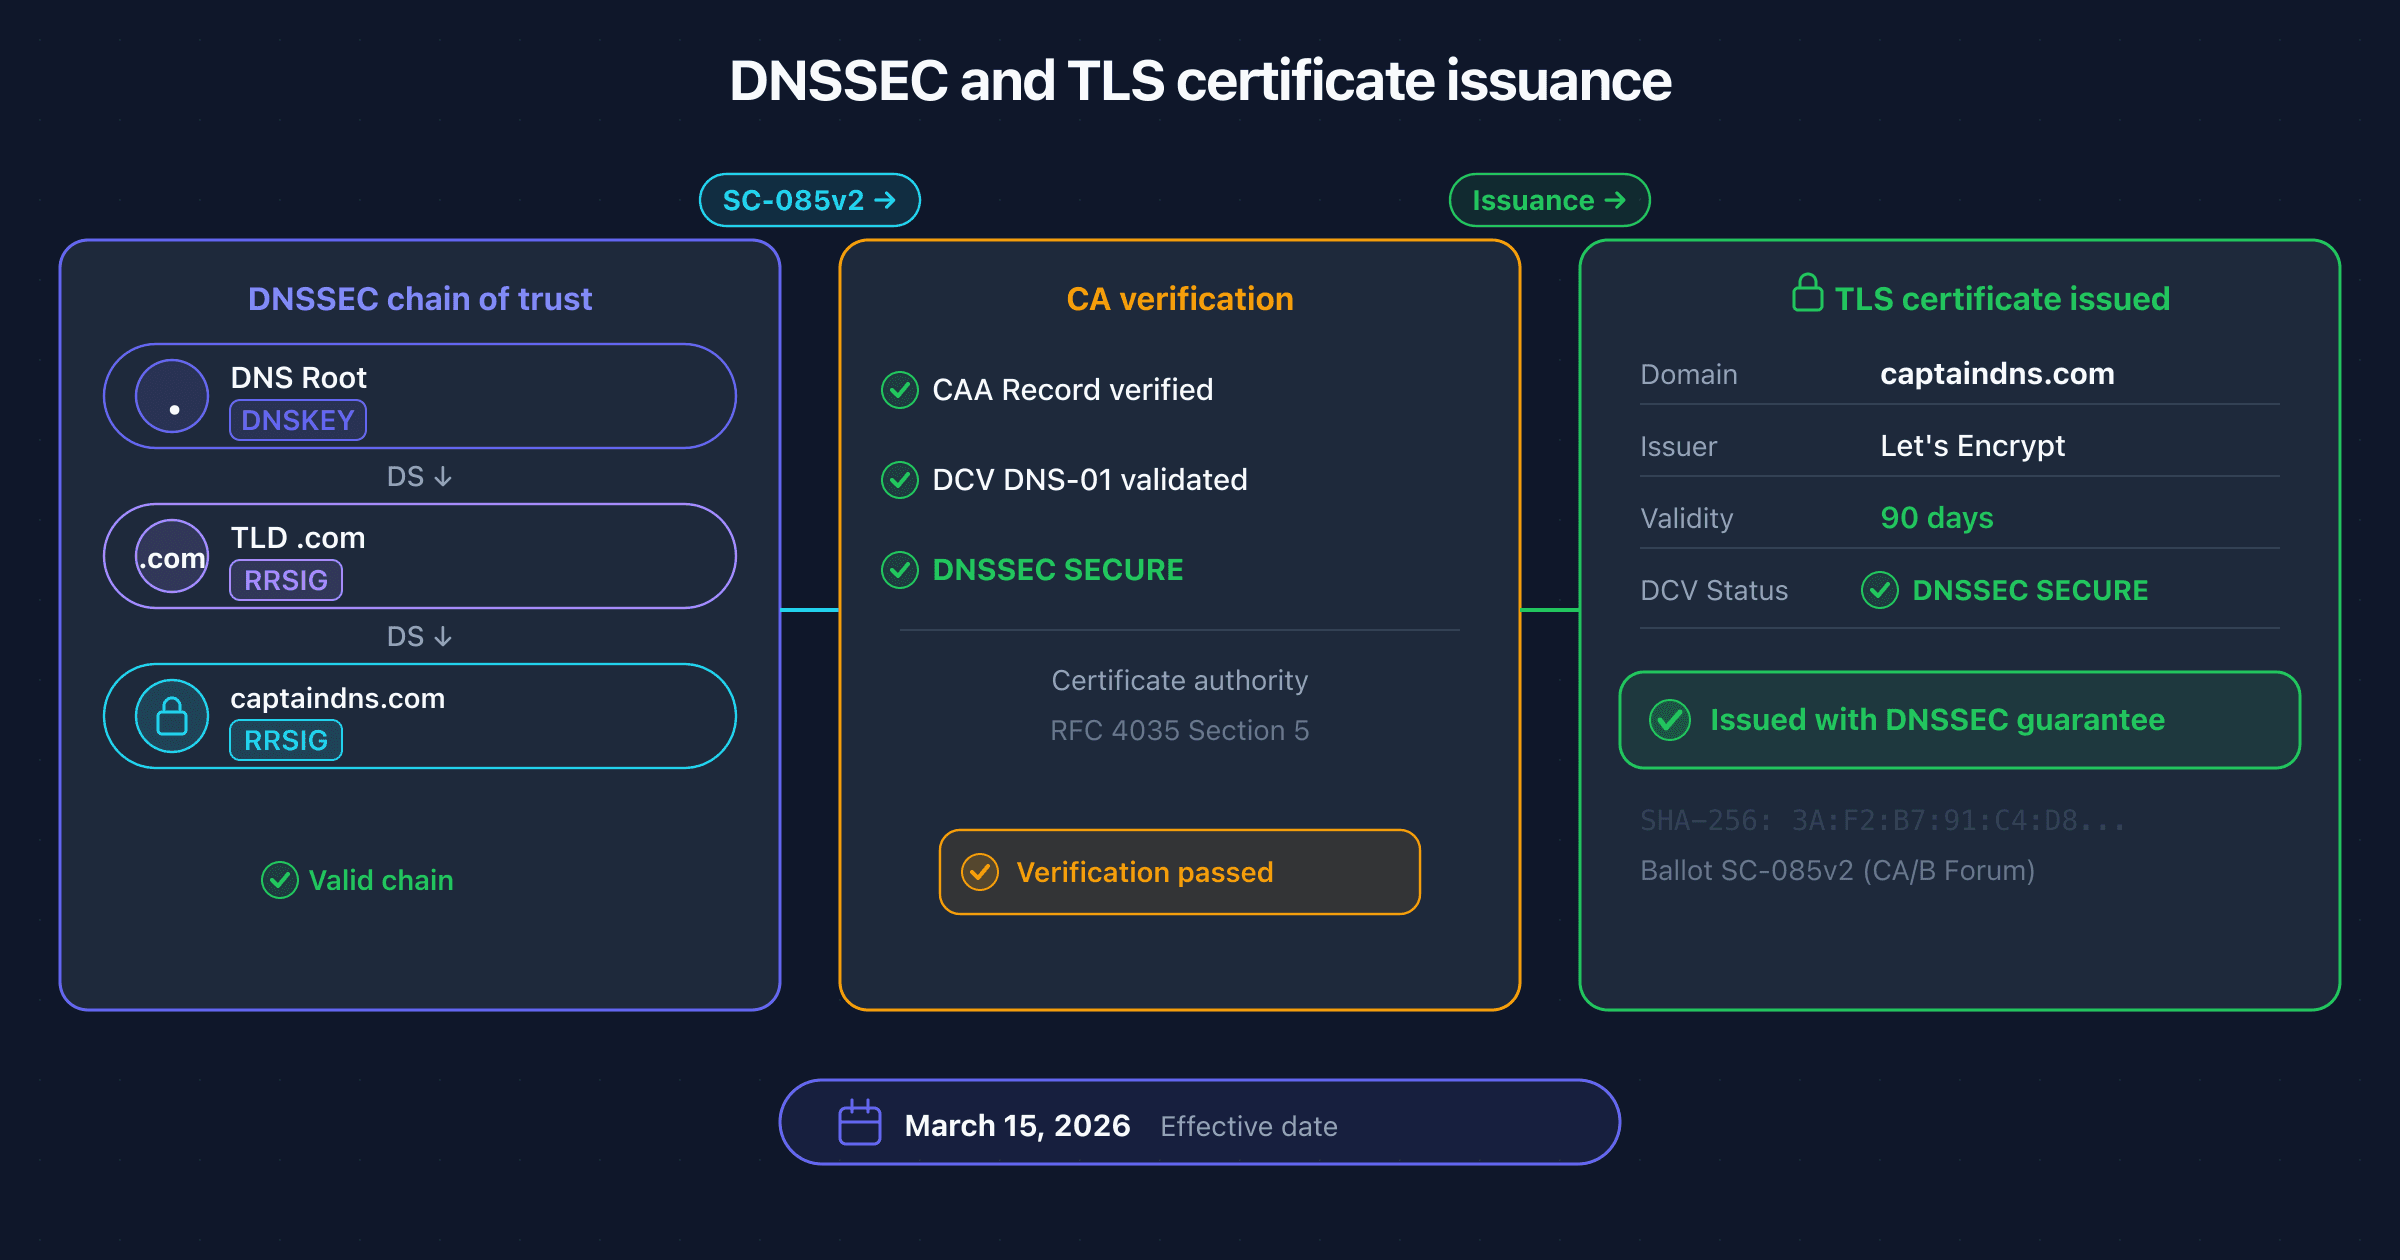
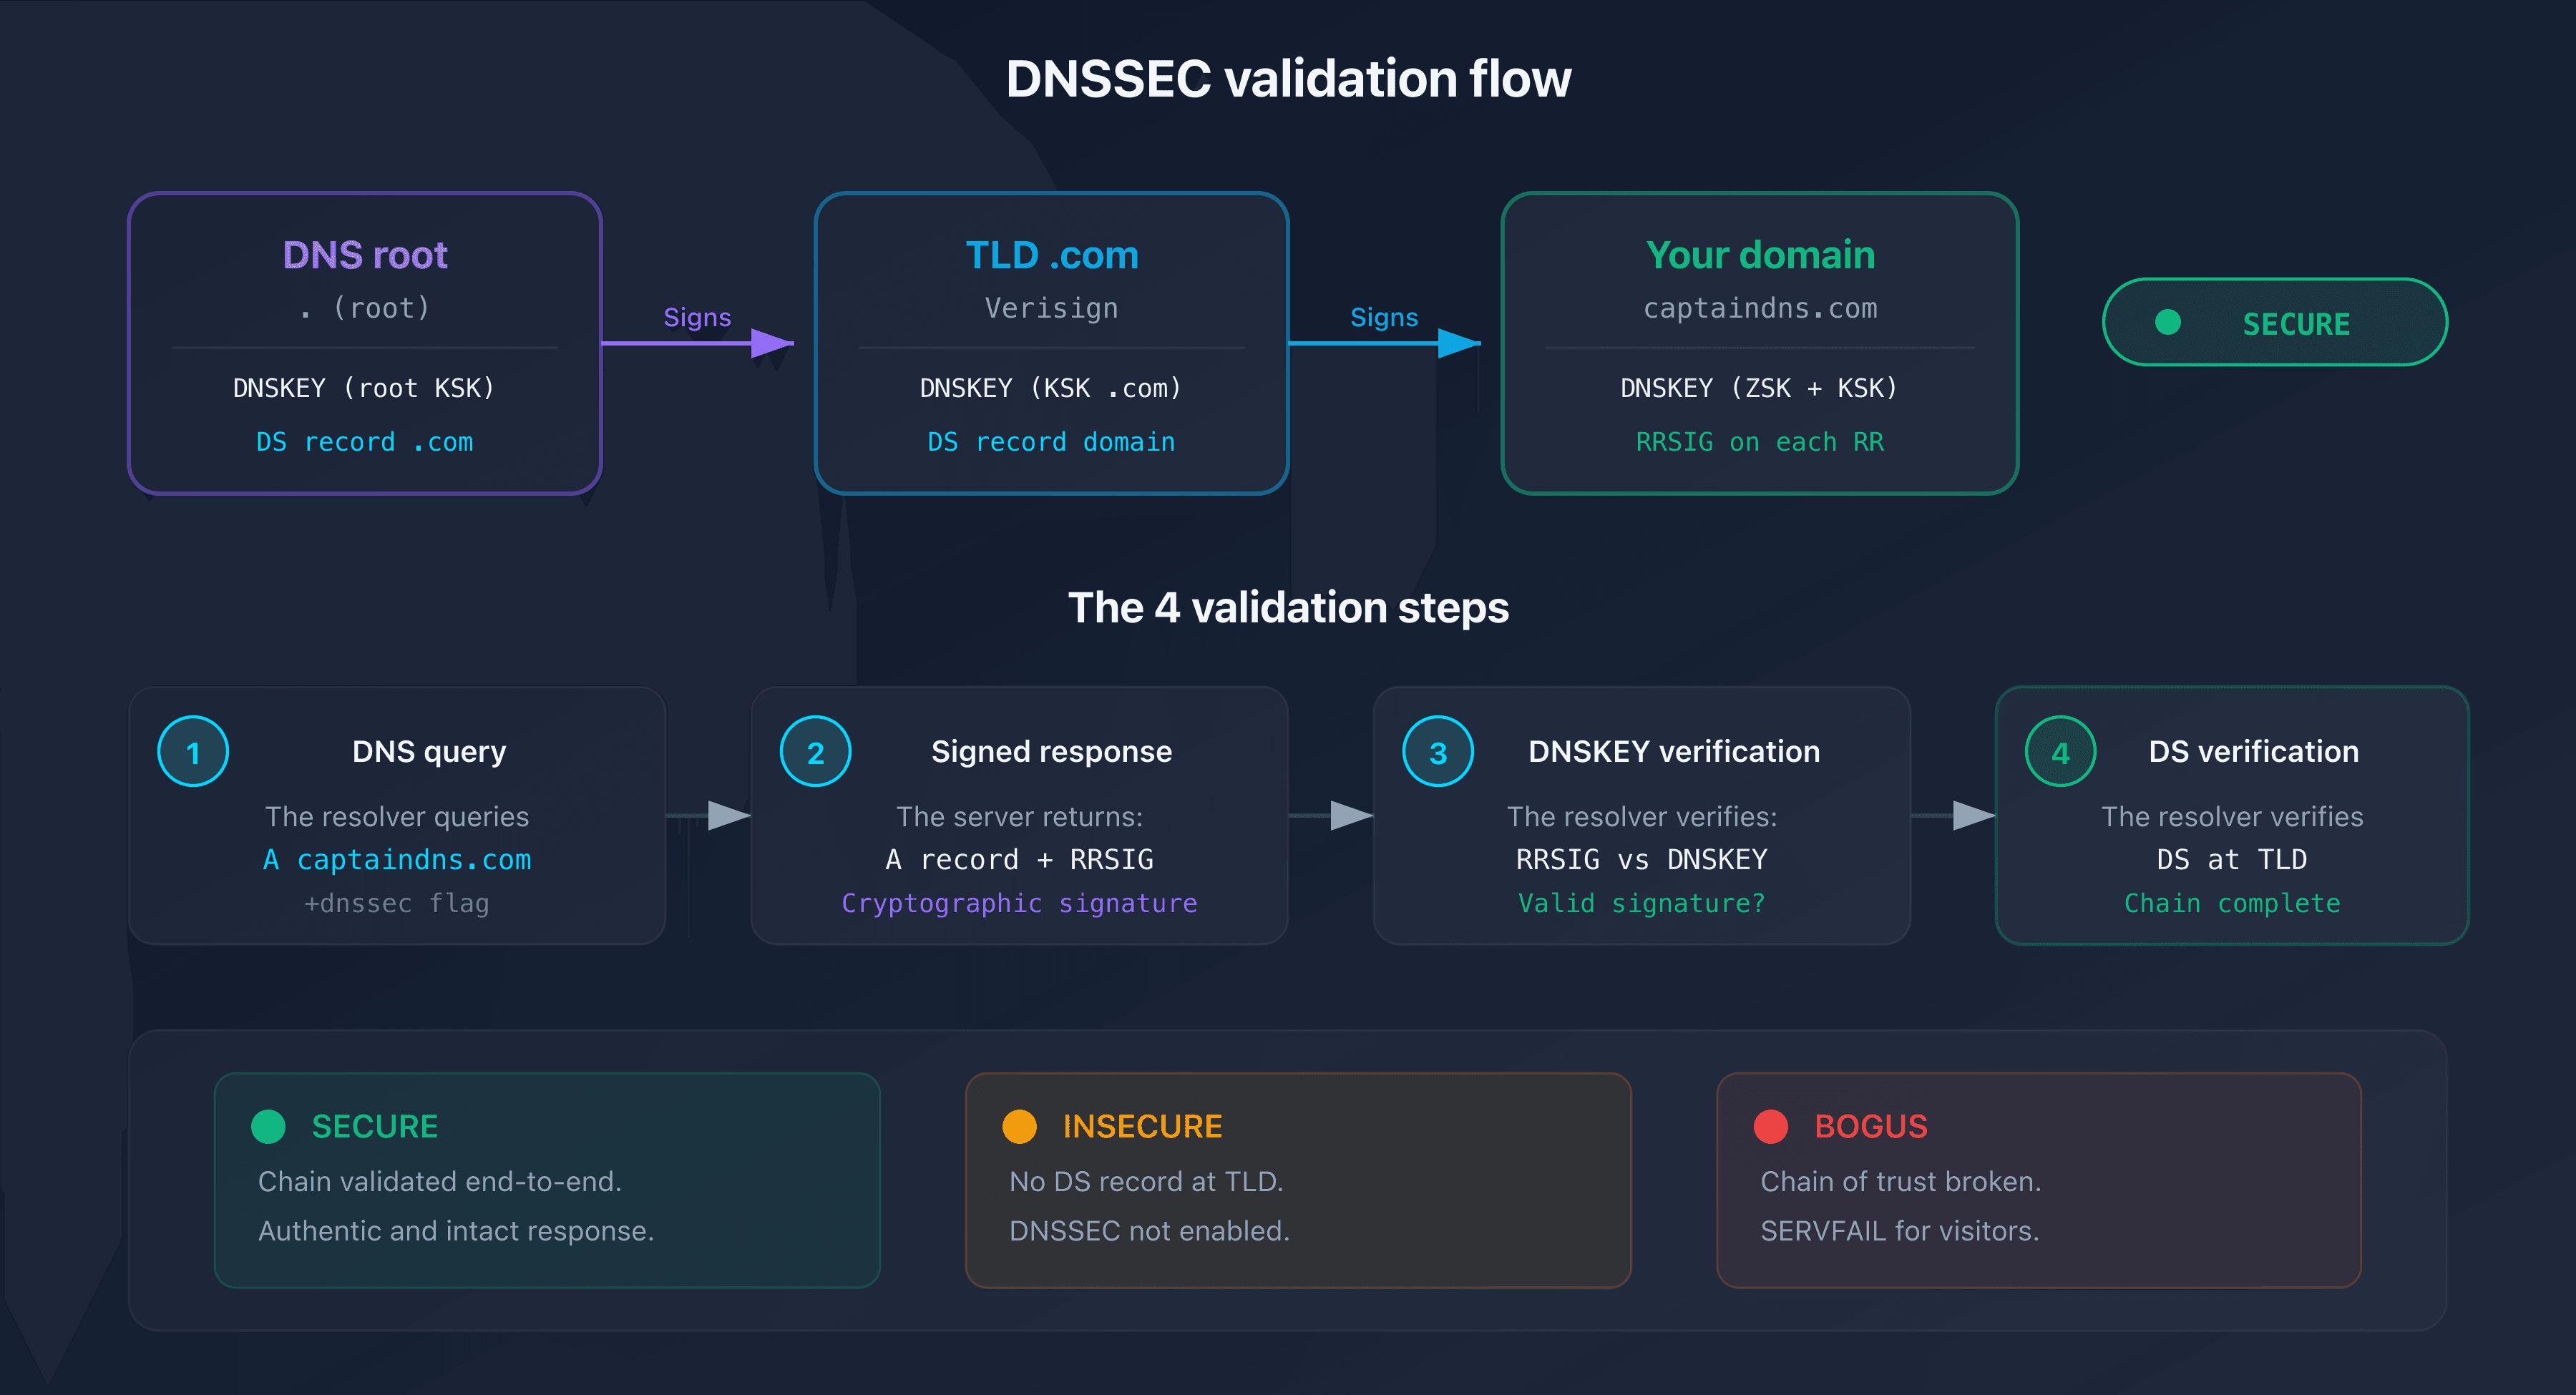
The DS record (Delegation Signer) links your zone to the parent zone (e.g., .com). Published at the registrar, it contains a hash of your KSK. The resolver walks the chain of trust: DNS root, TLD, then your domain.
The 4-step validation flow
- The resolver requests the A record for
captaindns.com - The authoritative server returns the A record and its RRSIG signature
- The resolver retrieves the zone's DNSKEY and verifies the signature
- The resolver checks the DS record at the TLD to confirm the DNSKEY is legitimate
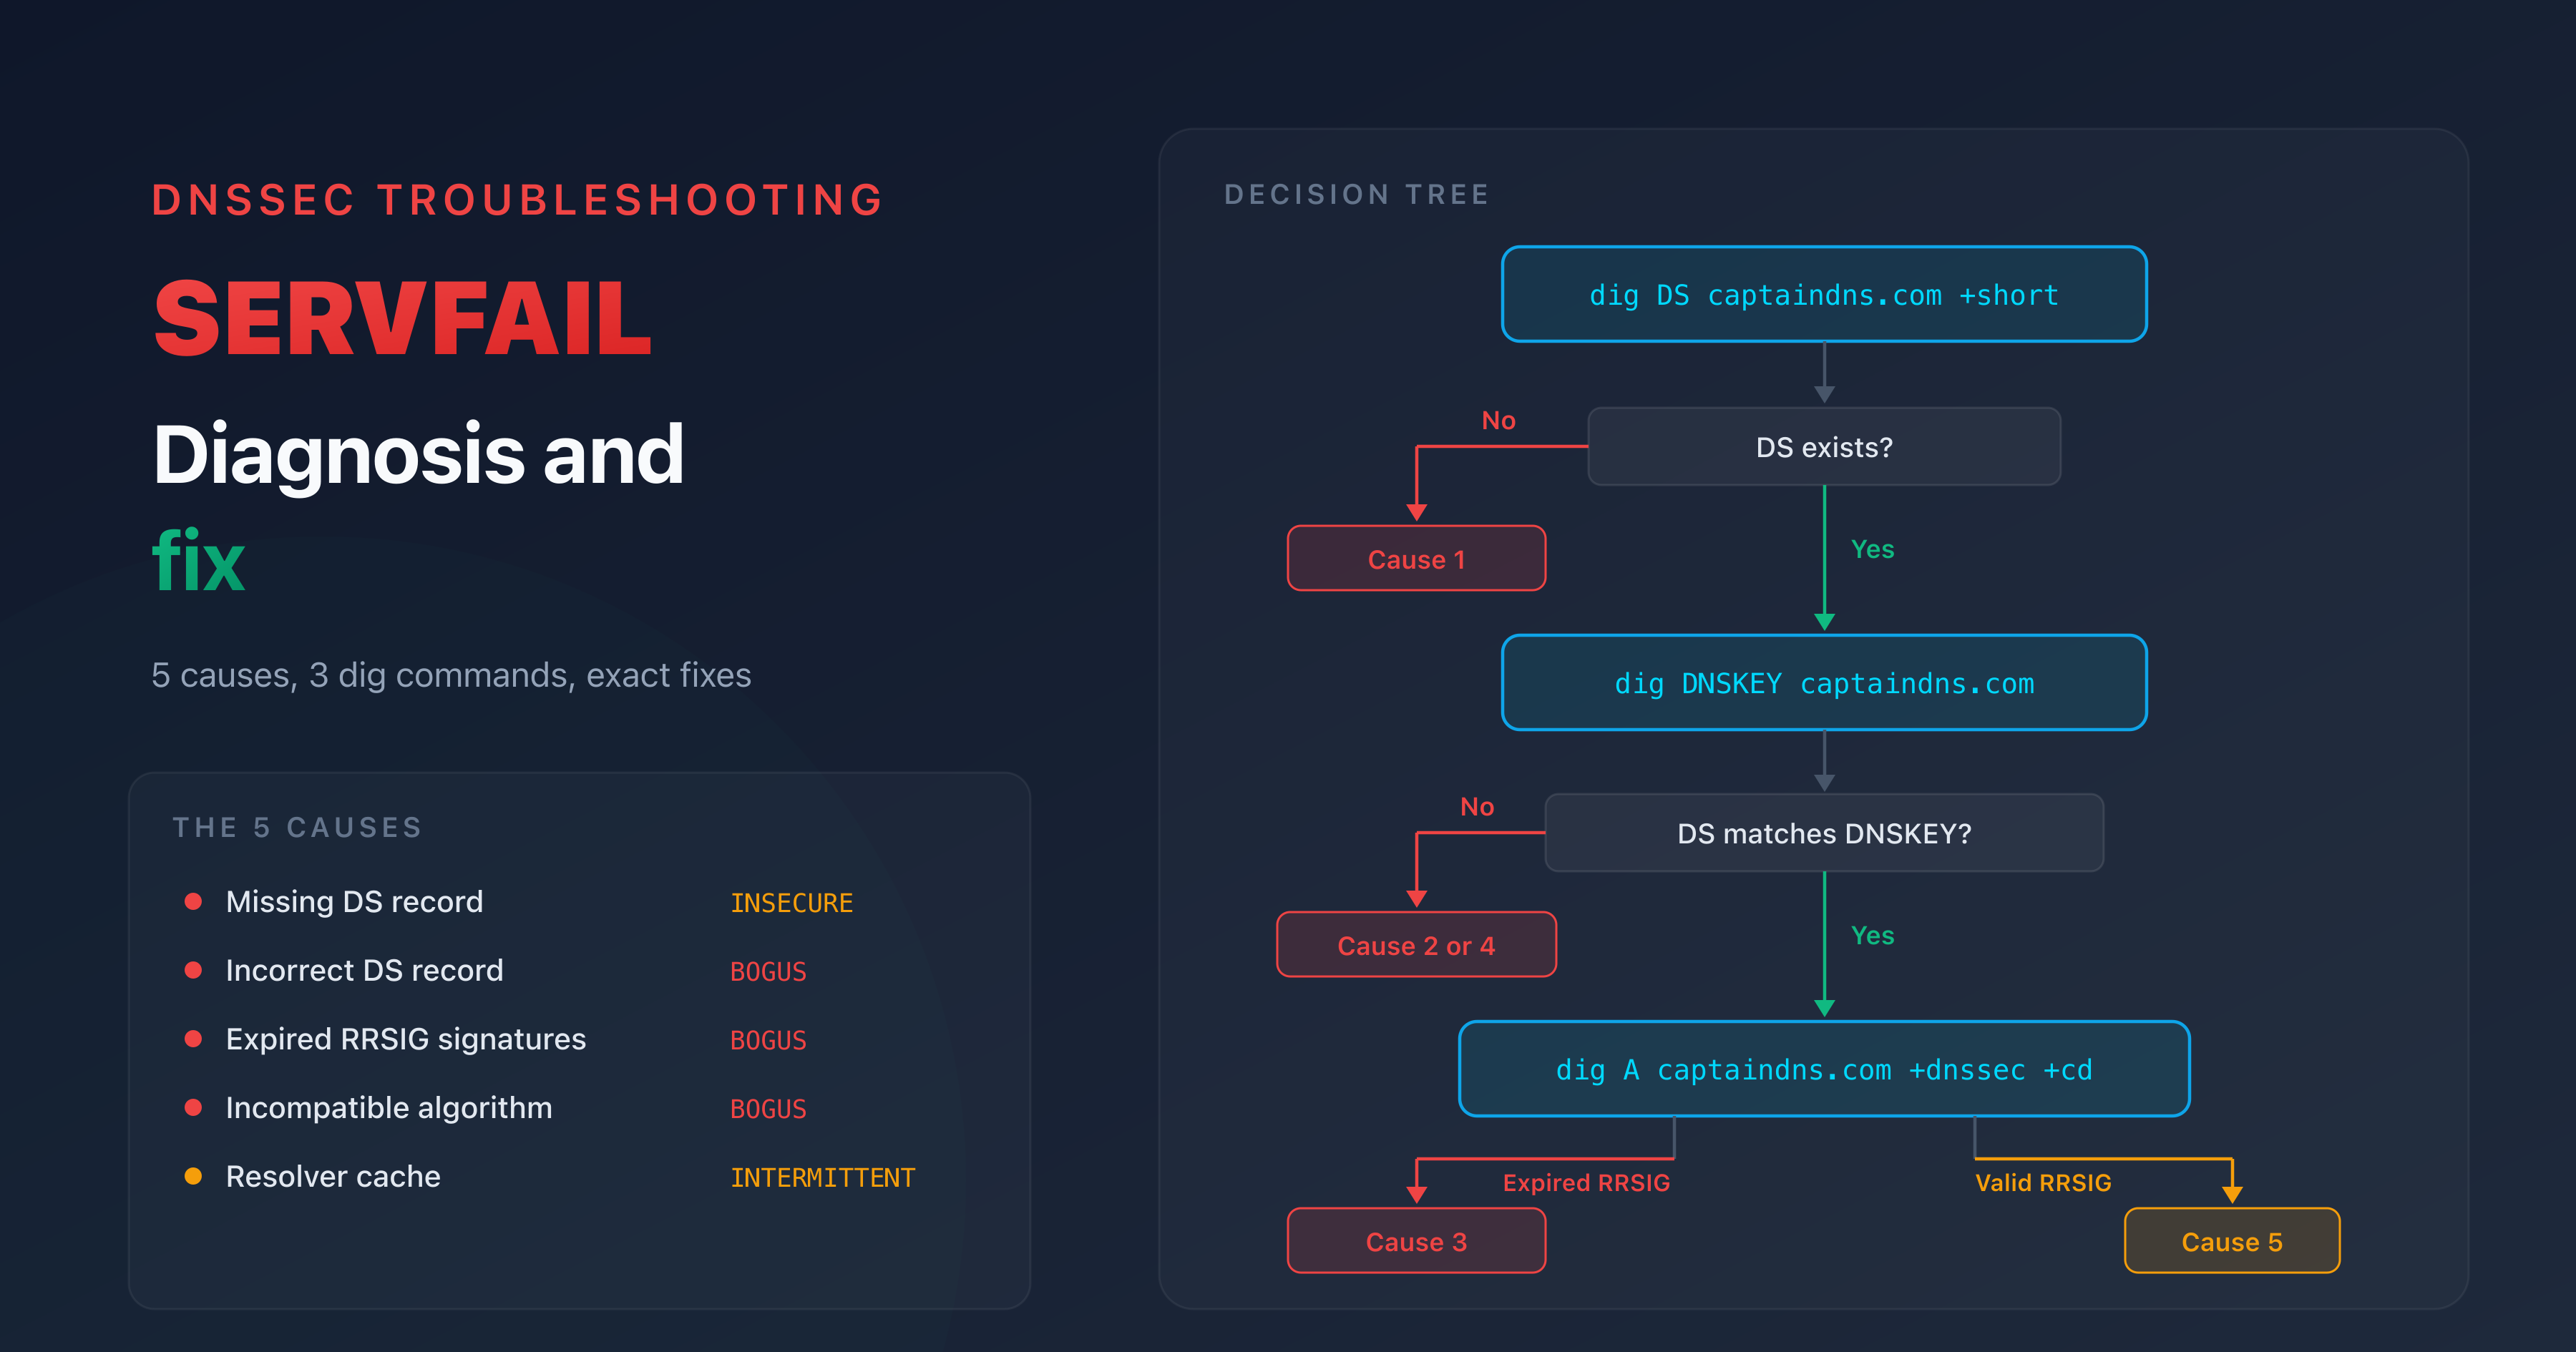
If any single step fails, the response is marked BOGUS and the resolver returns SERVFAIL to the client.
Prerequisites before enabling DNSSEC
Before you start, check these three points.
Does your DNS provider support zone signing?
Zone signing generates keys and signs your DNS records. Most major DNS providers support it, but automatic vs manual options vary.
| DNS provider | Zone signing | Automatic |
|---|---|---|
| Cloudflare | Yes | Yes (1 click) |
| AWS Route 53 | Yes | Yes |
| Google Cloud DNS | Yes | Yes |
| OVHcloud DNS | Yes | Yes |
| BIND 9 | Yes | Manual (dnssec-keygen) |
| PowerDNS | Yes | Semi-auto |
Does your registrar support DS records?
The registrar must allow you to add the DS record (or DNSKEY keys) so the TLD can validate your zone. All ICANN-accredited registrars support DS records, but the interface varies.
Simple case vs advanced case
- Simple case: your registrar and DNS provider are the same (e.g., Cloudflare for both). Activation is often one click.
- Advanced case: your registrar differs from your DNS provider (e.g., GoDaddy + Cloudflare DNS). You must manually copy the DS record from the provider to the registrar.
Enable DNSSEC by registrar
Cloudflare (registrar + DNS)
Cloudflare simplifies DNSSEC activation. If your domain uses Cloudflare as both registrar and DNS, the process is fully automatic.
Steps:
- Log in to the Cloudflare dashboard
- Select your domain
- Go to DNS then Settings
- Click Enable DNSSEC
- Cloudflare generates the keys, signs the zone, and automatically adds the DS record to the registrar
If Cloudflare is your DNS but not your registrar: Cloudflare displays the DS record parameters (Key Tag, Algorithm, Digest Type, Digest). Copy these values and add them manually at your registrar.
Propagation time: 5 to 15 minutes when Cloudflare is also the registrar. Up to 24 hours if the DS record is added manually elsewhere.
OVHcloud
OVHcloud supports DNSSEC natively for domains registered with them and using their DNS servers.
Steps:
- Log in to the OVHcloud control panel
- Go to Domain names then select your domain
- Click the DNS zone tab
- Find the DNSSEC section and click Enable
- OVHcloud enables zone signing and publishes the DS record automatically
Limitation: automatic activation only works if you're using OVHcloud's DNS servers. If you're using an external DNS, you'll need to add the DS record manually via the OVHcloud API.
Propagation time: 24 to 48 hours.
GoDaddy
GoDaddy supports DNSSEC for domains using their DNS servers. For external DNS, you can add DS records manually.
Steps (GoDaddy DNS):
- Log in to the GoDaddy dashboard
- Select Domain Settings for your domain
- Scroll down to the DNSSEC section
- Enable the DNSSEC toggle
- GoDaddy generates the keys and publishes the DS record
Steps (external DNS, e.g., Cloudflare):
- In the GoDaddy dashboard, go to DNS then DNSSEC
- Click Add (or Manage DS records)
- Enter the parameters provided by your DNS provider:
- Key Tag: numeric key identifier
- Algorithm: signing algorithm (e.g., 13 = ECDSAP256SHA256)
- Digest Type: hash algorithm (e.g., 2 = SHA-256)
- Digest: the public key hash
- Save
Propagation time: 24 to 48 hours.
Namecheap
Namecheap supports DNSSEC for domains using their DNS (BasicDNS or PremiumDNS) and allows manual DS record addition for external DNS.
Steps (Namecheap DNS):
- Log in to Namecheap
- Go to Domain List then click Manage for your domain
- In the Advanced DNS tab, find the DNSSEC section
- Enable DNSSEC
- Namecheap enables signing and publishes the DS record
Steps (external DNS):
- In Advanced DNS, DNSSEC section
- Click Add new DS record
- Fill in Key Tag, Algorithm, Digest Type, and Digest
- Save
Propagation time: a few hours to 48 hours.
AWS Route 53
Route 53 supports DNSSEC both as a DNS provider (zone signing) and as a registrar (DS record at the TLD).
Steps (enabling signing):
- Open the Route 53 console
- Go to Hosted zones and select your zone
- In the DNSSEC signing tab, click Enable DNSSEC signing
- Choose Create KSK or use an existing KMS key
- Route 53 generates the KSK, creates the DNSKEY records, and signs the zone
Steps (adding the DS record at the registrar):
If your domain is registered with Route 53:
- Go to Registered domains
- Select your domain, then Manage keys (DNSSEC)
- Route 53 displays the DS record information. Click Establish chain of trust
If your registrar is external: copy the DS record values from Route 53 and add them at your registrar.
Propagation time: 15 to 60 minutes (Route 53 registrar). Variable for external registrars.
Google Domains / Squarespace Domains
Since the transfer of Google Domains to Squarespace, DNSSEC management remains available.
Steps:
- Log in to Squarespace Domains
- Select your domain
- Go to DNS then Advanced settings
- In the DNSSEC section, enable the toggle
- If you're using an external DNS, add the DS record manually
Propagation time: 24 to 48 hours.
Verify that DNSSEC is active
After activation, propagation can take anywhere from a few minutes to 48 hours. Here's how to verify everything is working.
Verification with DNSSEC Checker
Use our DNSSEC Checker for a complete verification:
- Enter your domain name
- The tool checks the DS record, validates RRSIG signatures, and verifies chain-of-trust consistency
- The result is instant: SECURE, INSECURE (not enabled), or BOGUS (broken configuration)
Command-line verification
dig captaindns.com +dnssec +short
If DNSSEC is active, you'll see an ad (Authenticated Data) flag in the response:
dig captaindns.com +dnssec | grep flags
;; flags: qr rd ra ad; QUERY: 1, ANSWER: 2
The ad flag confirms that the resolver successfully validated the DNSSEC chain.
The three DNSSEC states
| State | Meaning | Action |
|---|---|---|
| SECURE | DNSSEC active and validated | No action required |
| INSECURE | No DS record at the TLD | Enable DNSSEC (this guide) |
| BOGUS | Broken chain of trust | Diagnosis required (see our SERVFAIL guide) |
Common mistakes and pitfalls
Forgetting the DS record at the registrar
This is the number one mistake. You enable zone signing but forget the DS record at the registrar. The zone is signed, yet no resolver can validate the chain of trust. DNSSEC appears as INSECURE (not BOGUS, because the chain simply isn't established).
Solution: check for the DS record with dig DS captaindns.com +short. If the response is empty, add the DS record at your registrar. You can also verify with our DNS Lookup tool.
Misconfigured TTL during activation
If your DS record TTL is too long (e.g., 86400s = 24 hours), errors take a long time to correct. Start with a short TTL (300s = 5 minutes) during activation. Increase it once you confirm validation works.
Poorly managed key rotation (KSK rollover)
DNSSEC keys have a limited lifespan. The ZSK is typically rotated every 3 months, the KSK every 1 to 2 years. Most managed DNS providers handle rotation automatically. If you run your own infrastructure (BIND, PowerDNS), plan rollovers carefully to avoid breaking the chain.
SERVFAIL after activation
If visitors receive SERVFAIL errors after enabling DNSSEC, the chain of trust is likely broken. Common causes:
- DS record that doesn't match the published DNSKEY
- Incorrect algorithm in the DS record
- Expired keys or expired RRSIG signatures
Recommended action plan
- Check compatibility: confirm that your registrar and DNS provider support DNSSEC
- Enable zone signing: follow the steps for your DNS provider (section above)
- Add the DS record: publish the DS record at your registrar (automatic or manual)
- Test the configuration: use the DNSSEC Checker to verify SECURE status
- Monitor keys: periodically verify that key rotation works correctly
Related DNSSEC guides
FAQ
Should I enable DNSSEC?
Yes. DNSSEC protects your visitors from DNS spoofing and man-in-the-middle attacks on DNS resolution. It's a security layer recommended by ICANN and increasingly required for certain TLDs. Activation is free with most registrars.
Does DNSSEC slow down DNS responses?
The impact is minimal. DNSSEC responses are larger (RRSIG signatures, DNSKEY keys), adding a few hundred bytes. In practice, the added latency is under 10 ms on modern resolvers that cache the keys.
Is DNSSEC free?
With most providers, yes. Cloudflare, OVHcloud, Namecheap, and Route 53 include DNSSEC at no extra cost. GoDaddy also offers it at no additional charge for domains using their DNS.
What's the difference between DNSSEC and DNS over HTTPS (DoH)?
DNSSEC and DoH solve different problems. DNSSEC guarantees the authenticity of DNS responses: the answer hasn't been tampered with. DoH encrypts traffic between the client and the resolver, hiding which domains you query. The two are complementary.
Does DNSSEC protect against DDoS attacks?
No. DNSSEC protects against DNS response forgery, not volumetric attacks. Since DNSSEC responses are larger, they can even be exploited for amplification attacks. Use a WAF or anti-DDoS service for volumetric threats.
What happens if DNSSEC is misconfigured?
A misconfigured DNSSEC produces SERVFAIL errors on validating resolvers (1.1.1.1, 8.8.8.8, etc.). Your visitors won't be able to reach your site. That's why post-activation verification is essential.
How do I disable DNSSEC if needed?
Disable in reverse order: first remove the DS record at the registrar, then wait for propagation (TTL duration). Only then disable zone signing at your DNS provider. Reversing the order causes resolvers to see a signed zone without a valid DS, triggering SERVFAIL errors.
Is DNSSEC required for sending email?
DNSSEC isn't required to send emails, but it strengthens email infrastructure security. Combined with DANE (RFC 6698), DNSSEC lets you publish TLS certificates in DNS. This provides an alternative to MTA-STS for securing SMTP transport.
Glossary
- DS record (Delegation Signer): a DNS record published at the TLD level that contains a hash of your zone's KSK public key. It's the link between your zone and the parent zone.
- DNSKEY: a DNS record containing the zone signing public key (ZSK and/or KSK).
- RRSIG: a cryptographic signature of a DNS record. Each record type (A, MX, TXT) has its own RRSIG.
- KSK (Key Signing Key): the key signing key. Signs the DNSKEY records, and its hash is published in the DS record.
- ZSK (Zone Signing Key): the zone signing key. Signs all DNS records in the zone.
- NSEC/NSEC3: authenticated denial of existence records. They prove that a requested record doesn't exist, without revealing the entire zone.