Set up DANE/TLSA with Postfix, Bind and Let's Encrypt
By CaptainDNS
Published on February 22, 2026
- DANE/TLSA ties your mail server's TLS certificate to a DNSSEC-signed DNS record, eliminating reliance on certificate authorities
- The recommended combination is
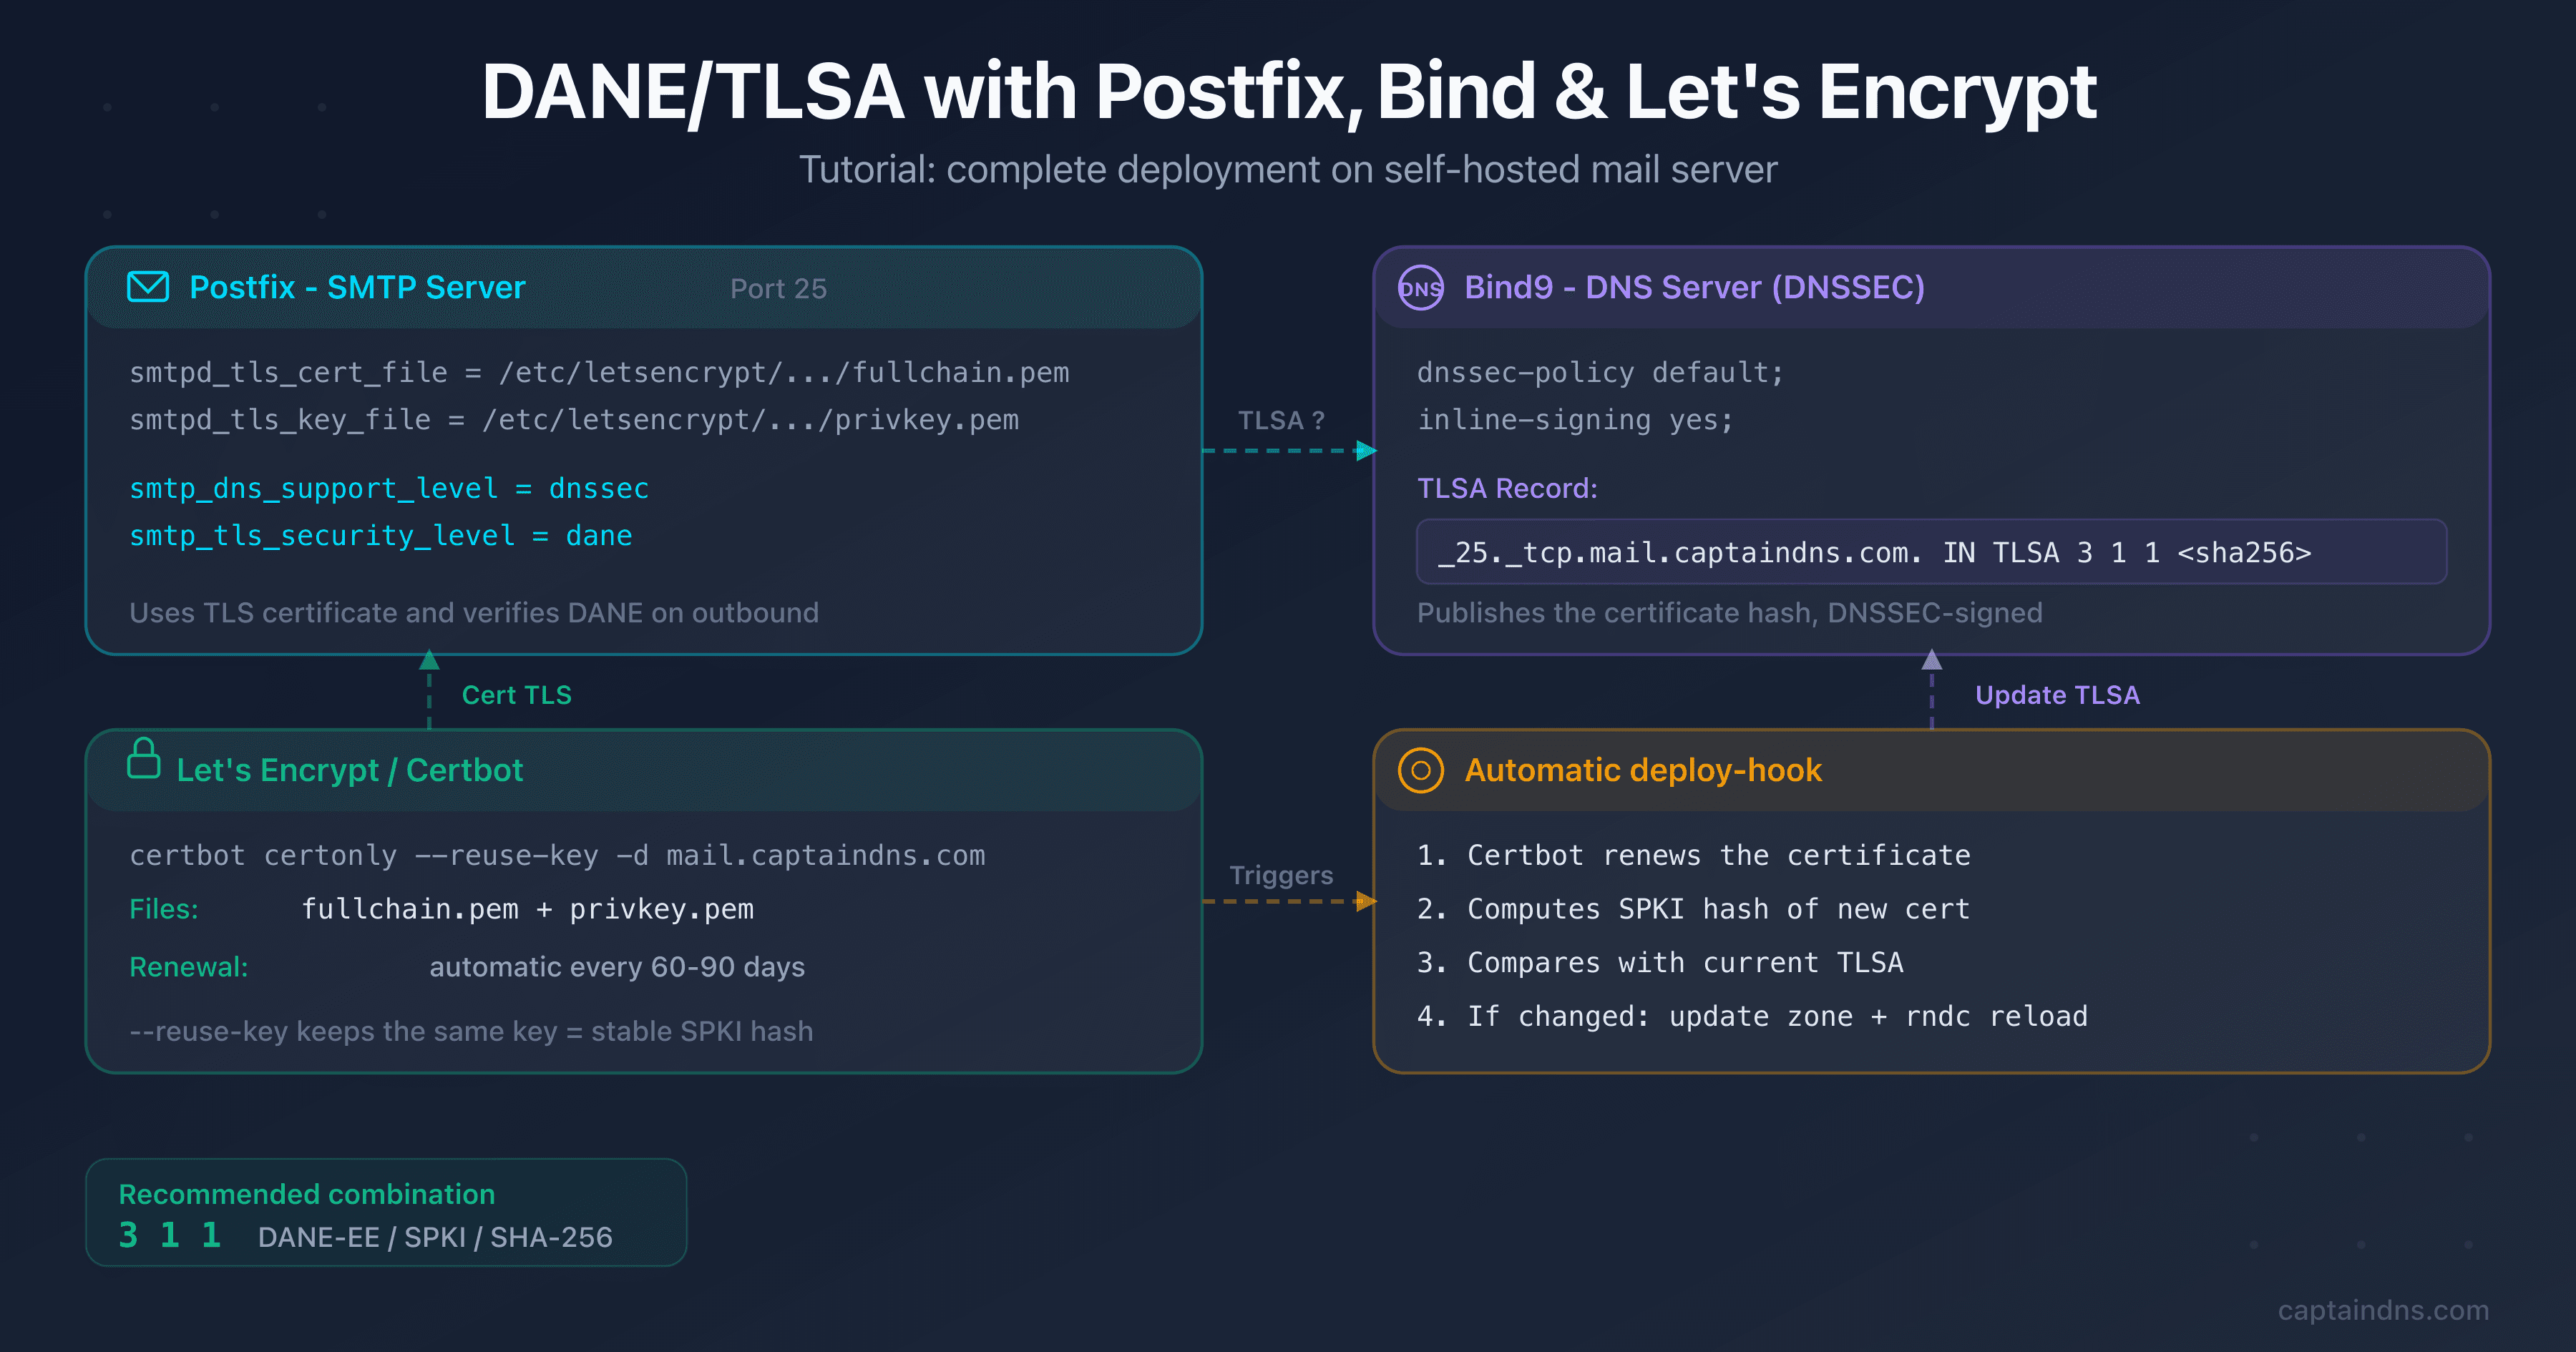
3 1 1(DANE-EE, SPKI, SHA-256): the TLSA hash survives Let's Encrypt renewals as long as the private key stays the same - Postfix natively supports outbound DANE verification with
smtp_dns_support_level = dnssecandsmtp_tls_security_level = dane - Automation relies on a Certbot deploy-hook that regenerates the TLSA hash and reloads the Bind9 zone on each renewal
- Verify your deployment with
dig TLSA,openssl s_clientand the CaptainDNS DANE/TLSA inspector
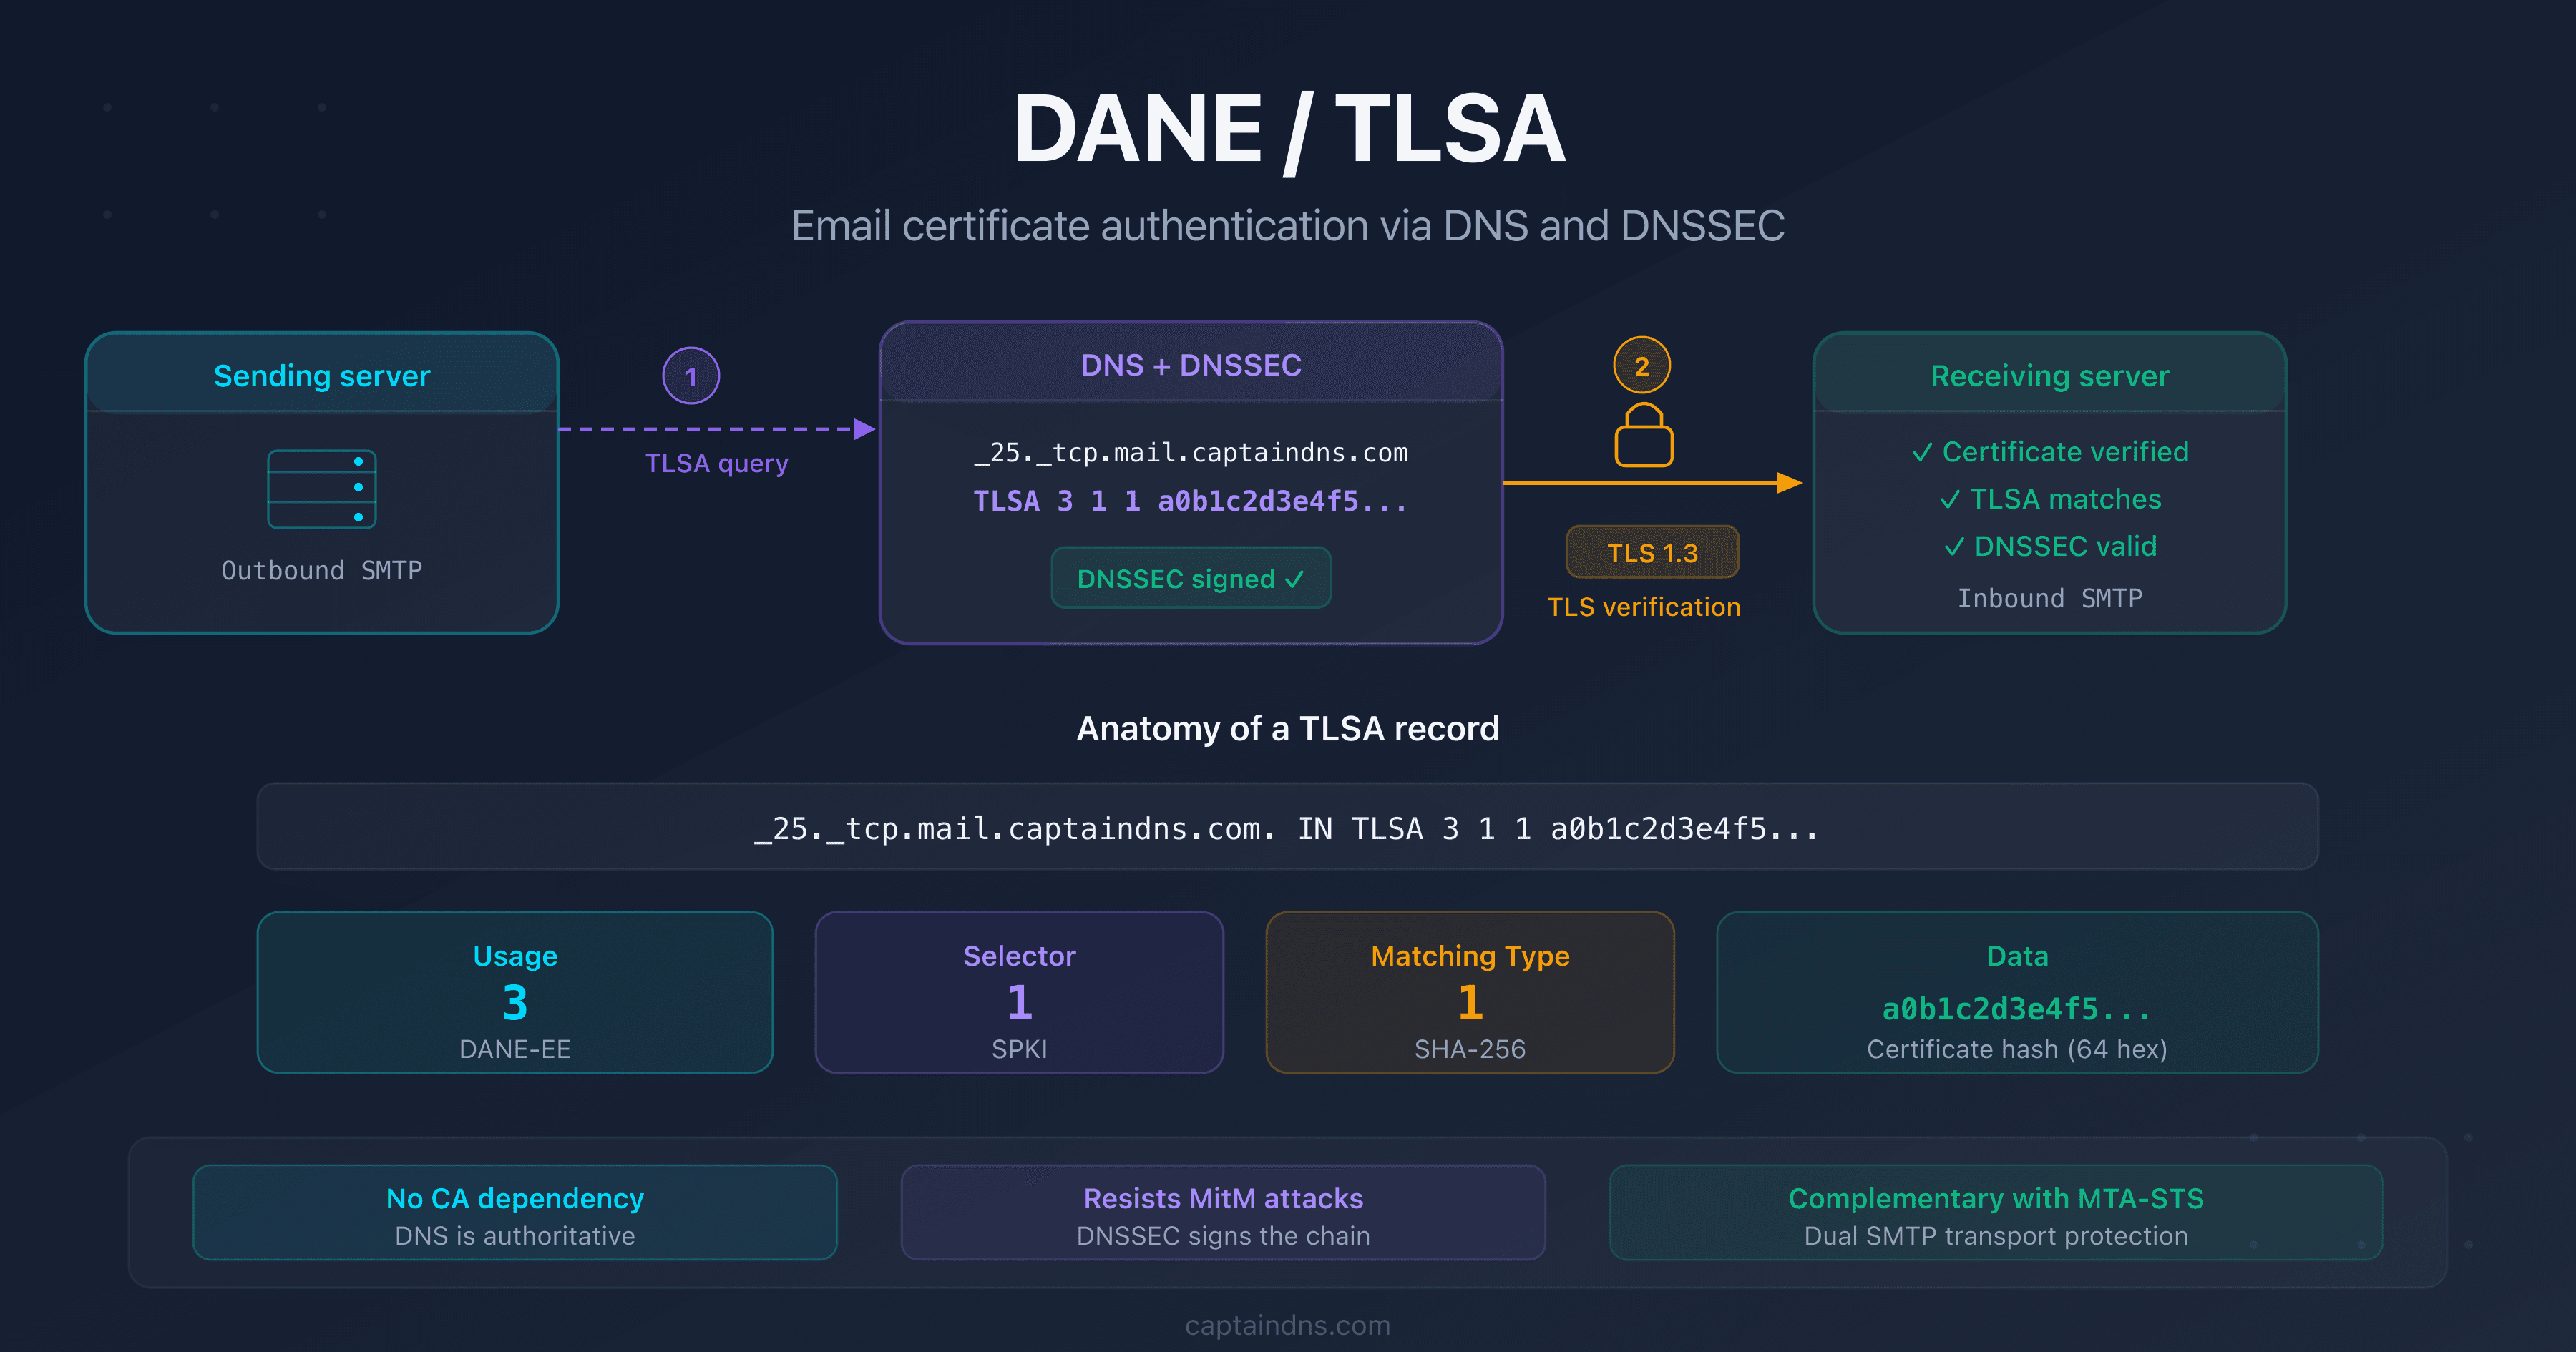
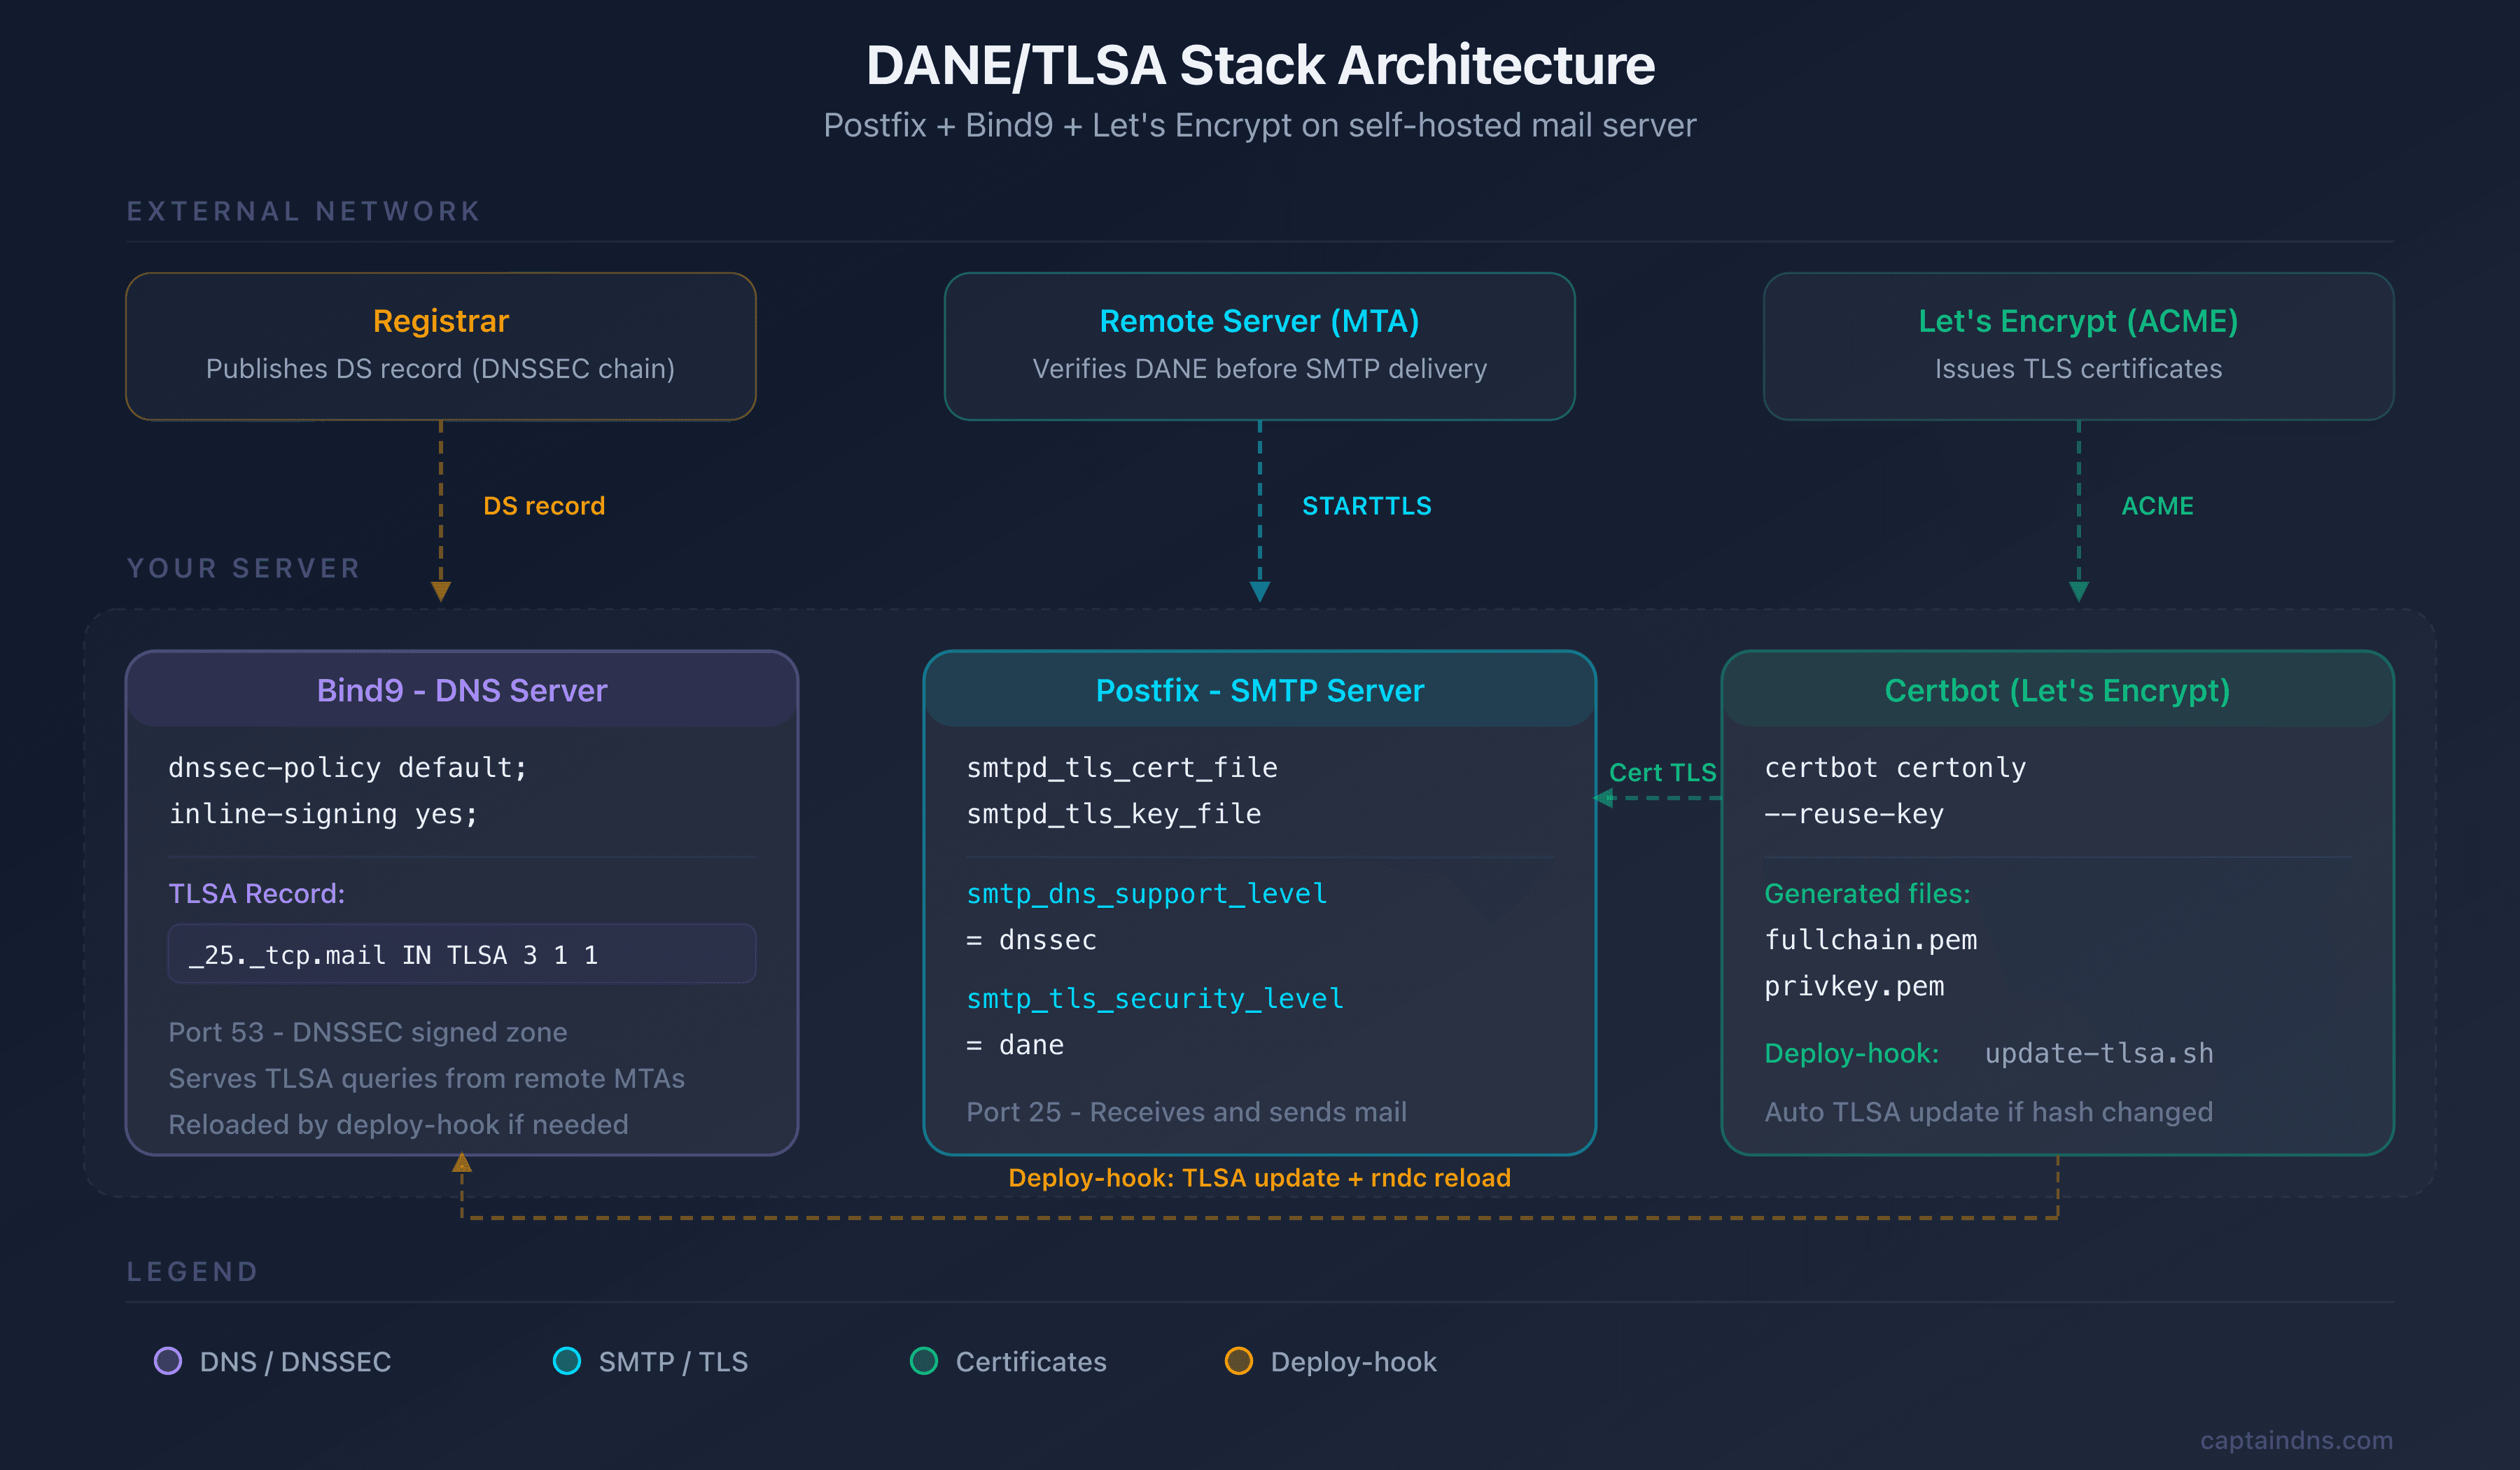
SMTP traffic between mail servers is vulnerable by design. Without DANE, a man-in-the-middle can strip TLS from an SMTP session and neither side will notice. DANE (DNS-based Authentication of Named Entities) fixes this: you publish a TLSA record in your DNSSEC-signed zone, and remote servers know exactly which certificate yours must present. No certificate authority in the trust path, no room for silent downgrades.
The practical challenge is Let's Encrypt. Certificates renew every 90 days. If the TLSA hash falls out of sync with the live certificate, DANE-aware servers like Gmail or Postfix will refuse the connection outright. A single missed renewal can break inbound mail delivery for hours.
This tutorial walks through the complete stack: Postfix for SMTP, Bind9 for DNSSEC, Let's Encrypt for TLS, and a deploy-hook that keeps everything in sync automatically. Every command is copy-paste ready on Debian 12+ or Ubuntu 22.04+.
Audience: Linux sysadmins managing a self-hosted mail server. Assumes working knowledge of Postfix, DNS and the terminal. For DANE and TLSA fundamentals, start with our complete DANE/TLSA guide (first article in this series, linked at the bottom of the page).
Prerequisites
Every component below is required. A missing piece will cause silent failures that are hard to diagnose after deployment.
| Component | Minimum version | Check |
|---|---|---|
| Debian/Ubuntu | 12+ / 22.04+ | cat /etc/os-release |
| Postfix | 3.4+ (native DANE support) | postconf mail_version |
| Bind9 | 9.18+ (DNSSEC inline-signing) | named -v |
| Certbot | 2.0+ | certbot --version |
| Active DNSSEC | Signed zone + DS at registrar | dig +dnssec captaindns.com SOA |
DNSSEC is the foundation of DANE. Without a signed zone and a DS record at the registrar, TLSA records have no cryptographic backing and DANE-aware servers will ignore them. Bind9 9.18+ supports inline-signing, which simplifies DNSSEC management considerably. Enable it before proceeding.
Ports and network access
Postfix uses port 25 (SMTP) and optionally 587 (submission). Let's Encrypt requires port 80 or 443 for the HTTP-01 challenge (or a DNS-01 challenge if port 80 is not available on the mail server). Make sure these ports are open in your firewall.
Configure DNSSEC with Bind9
DANE without DNSSEC is meaningless: any attacker who can spoof DNS responses can also spoof the TLSA record. If your zone is already DNSSEC-signed, skip to the next section. Otherwise, here is the minimal configuration with Bind9 and inline-signing.
Enable inline-signing
In your zone configuration file (/etc/bind/named.conf.local or equivalent):
zone "captaindns.com" {
    type primary;
    file "/var/lib/bind/captaindns.com.zone";
    dnssec-policy default;
    inline-signing yes;
    key-directory "/var/lib/bind/keys";
};
The dnssec-policy default directive automatically generates and manages ZSK and KSK keys. inline-signing signs the zone on the fly without modifying the source file.
Publish the DS at the registrar
After the first zone load, Bind9 generates the keys. Retrieve the DS record:
# List generated keys
ls /var/lib/bind/keys/

# Extract the DS record (adapt the KSK filename)
dnssec-dsfromkey /var/lib/bind/keys/Kcaptaindns.com.+013+xxxxx.key
Submit the DS record to your registrar (web interface or API). Propagation takes from a few minutes to 48 hours depending on the registrar. Do not publish TLSA records until the DNSSEC chain validates end-to-end.
Verify the DNSSEC chain
dig +dnssec +short captaindns.com SOA
# Should return the SOA with the "ad" flag (Authenticated Data)

dig +dnssec captaindns.com DNSKEY
# Should return the DNSKEYs with RRSIG signatures
Generate the Let's Encrypt certificate
With DNSSEC in place, the next step is obtaining the TLS certificate that DANE will pin.
Obtain the certificate
# Install Certbot (if not already installed)
apt install certbot

# Obtain a certificate for the mail server hostname
certbot certonly --standalone -d mail.captaindns.com
If port 80 is already used by another service, use the webroot plugin or the DNS-01 challenge:
# Alternative with webroot (if Apache/Nginx runs on the server)
certbot certonly --webroot -w /var/www/html -d mail.captaindns.com

# Alternative with DNS challenge (if port 80 is unavailable)
certbot certonly --manual --preferred-challenges dns -d mail.captaindns.com
Configure Postfix to use the certificate
Edit /etc/postfix/main.cf:
# TLS certificate (inbound - smtpd)
smtpd_tls_cert_file = /etc/letsencrypt/live/mail.captaindns.com/fullchain.pem
smtpd_tls_key_file = /etc/letsencrypt/live/mail.captaindns.com/privkey.pem
smtpd_tls_security_level = may
smtpd_tls_protocols = !SSLv2, !SSLv3, !TLSv1, !TLSv1.1
smtpd_tls_mandatory_protocols = !SSLv2, !SSLv3, !TLSv1, !TLSv1.1

# Outbound DANE verification (smtp)
smtp_dns_support_level = dnssec
smtp_tls_security_level = dane
smtp_tls_loglevel = 1
These two blocks serve different roles and are often confused. smtpd_tls_* configures TLS for inbound connections (your server presents its certificate to senders), while smtp_tls_* configures TLS for outbound connections (Postfix verifies the recipient's TLSA records via DNSSEC). Both are needed for a fully DANE-capable mail server.
Reload Postfix:
postfix reload
Create the TLSA record
This is where DANE comes together: the TLSA record binds your certificate's identity to a DNSSEC-signed DNS entry.
Choose the TLSA parameters
RFC 7672 (section 3.1) explicitly recommends the 3 1 1 combination for SMTP servers:
| Field | Value | Meaning |
|---|---|---|
| Usage | 3 (DANE-EE) | Direct verification of the server certificate |
| Selector | 1 (SPKI) | Hash of the public key (not the entire certificate) |
| Matching type | 1 (SHA-256) | SHA-256 hash |
Why SPKI over full certificate? The SPKI hash depends only on the public key, not on the certificate metadata (issuer, expiry, serial). This means the hash survives Let's Encrypt renewals as long as the private key is reused. For a 90-day renewal cycle, this distinction is the difference between hands-off automation and a maintenance headache every three months.
Generate the TLSA hash
# Extract the SPKI SHA-256 hash from the certificate
openssl x509 -in /etc/letsencrypt/live/mail.captaindns.com/cert.pem \
  -pubkey -noout | \
  openssl pkey -pubin -outform DER | \
  openssl dgst -sha256 -binary | \
  xxd -p -c 64
The result is a 64-character hexadecimal string, for example:
a1b2c3d4e5f67890a1b2c3d4e5f67890a1b2c3d4e5f67890a1b2c3d4e5f67890
Prefer a GUI? The CaptainDNS DANE/TLSA generator produces the same record instantly, no command line required.
Add the TLSA to the Bind9 zone
The TLSA record name follows the format _port._protocol.hostname. For port 25 (SMTP):
_25._tcp.mail.captaindns.com. IN TLSA 3 1 1 a1b2c3d4e5f67890a1b2c3d4e5f67890a1b2c3d4e5f67890a1b2c3d4e5f67890
Add this line to your zone file, increment the SOA serial, then reload:
# Reload the zone (Bind9 signs automatically with inline-signing)
rndc reload captaindns.com
Verify publication
# Verify that the TLSA is published and signed
dig +dnssec _25._tcp.mail.captaindns.com TLSA

# Expected result: the TLSA with RRSIG signatures
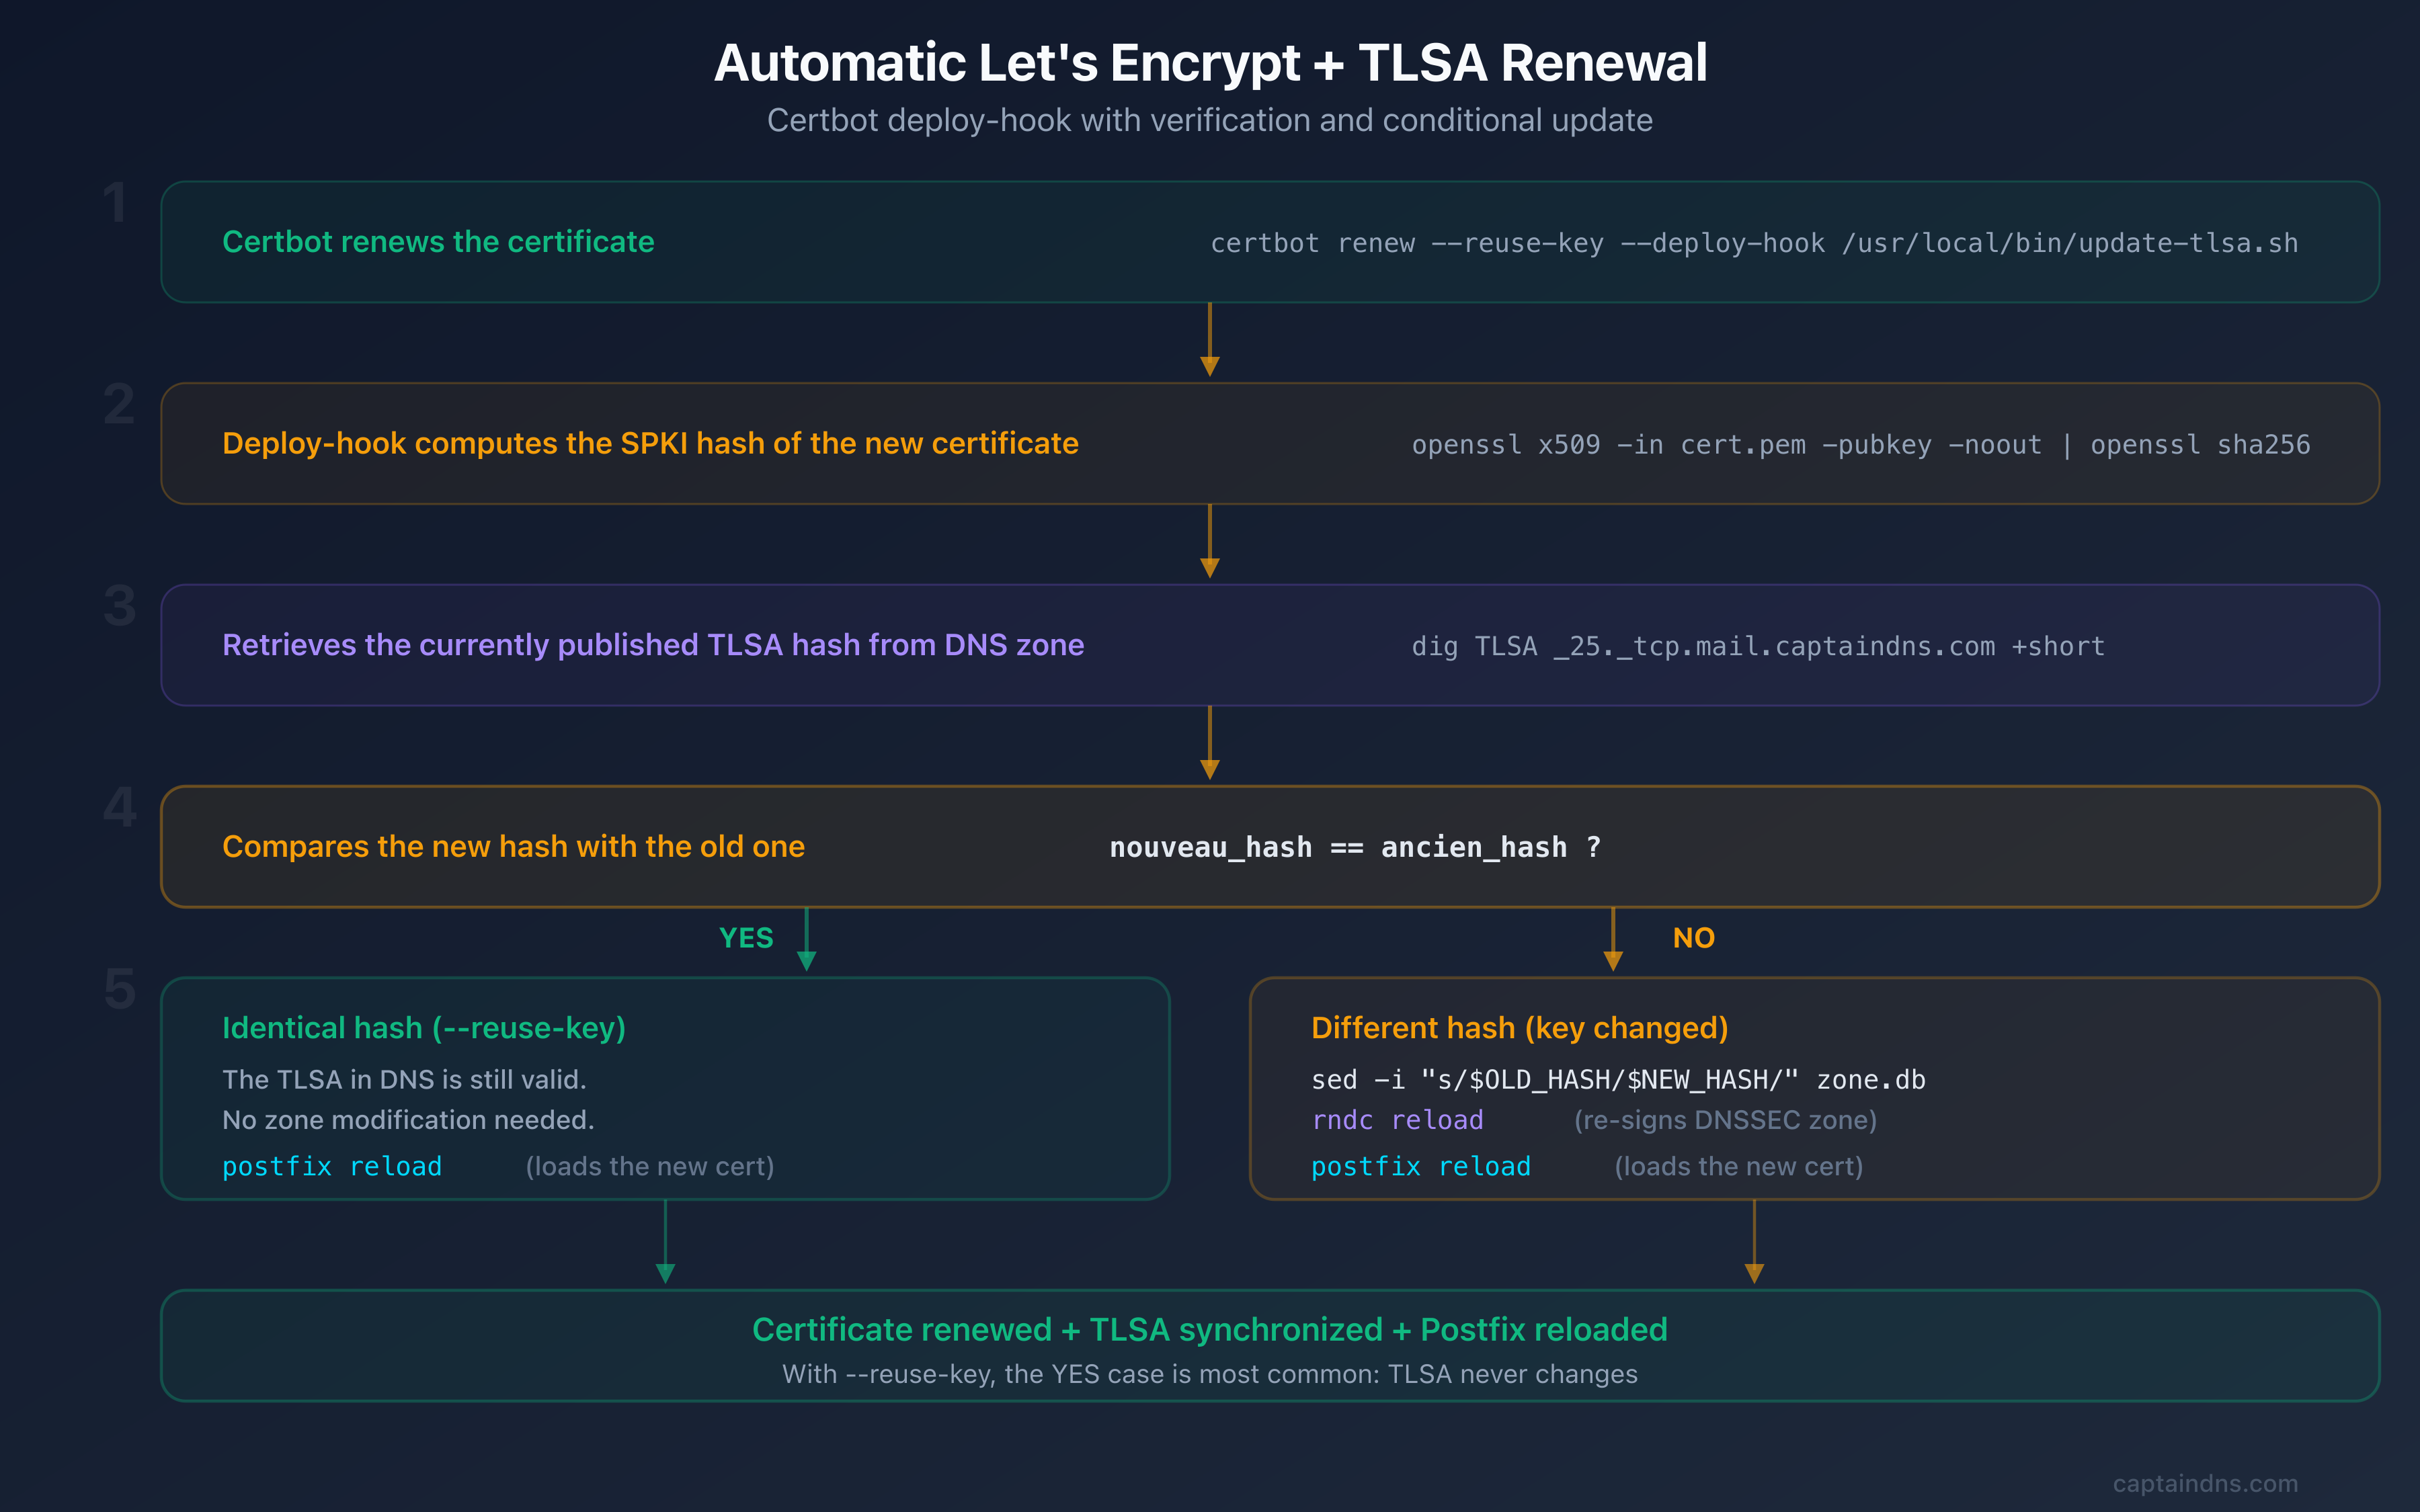
Automate renewal
A TLSA record that drifts from the live certificate will silently break inbound mail. This section is the most important part of the deployment: it ensures the TLSA stays in sync through every 90-day Let's Encrypt renewal cycle, automatically and without manual intervention.
Key reuse strategy
By default, Certbot generates a fresh private key on each renewal, which changes the SPKI hash and breaks DANE. To keep the same key (and therefore the same TLSA hash), add the --reuse-key option:
# Force private key reuse
certbot certonly --standalone -d mail.captaindns.com --reuse-key
Or add in /etc/letsencrypt/renewal/mail.captaindns.com.conf:
[renewalparams]
reuse_key = True
Deploy-hook for automatic updates
Even with --reuse-key, you should never rely on a single safeguard. A deploy-hook provides defense in depth: it verifies the hash after every renewal and updates the TLSA record if anything changed. Create the script /etc/letsencrypt/renewal-hooks/deploy/update-tlsa.sh:
#!/bin/bash
# Certbot deploy-hook: update TLSA if the SPKI hash changes

DOMAIN="mail.captaindns.com"
ZONE="captaindns.com"
ZONE_FILE="/var/lib/bind/captaindns.com.zone"
CERT="/etc/letsencrypt/live/$DOMAIN/cert.pem"

# Compute the new SPKI SHA-256 hash
NEW_HASH=$(openssl x509 -in "$CERT" -pubkey -noout | \
  openssl pkey -pubin -outform DER | \
  openssl dgst -sha256 -binary | \
  xxd -p -c 64)

# Retrieve the current hash from DNS
CURRENT_HASH=$(dig +short _25._tcp.$DOMAIN TLSA | awk '{print $4}')

if [ "$NEW_HASH" != "$CURRENT_HASH" ]; then
  echo "TLSA hash changed, updating zone..."

  # Replace the hash in the zone file
  sed -i "s/\(IN TLSA 3 1 1 \)[a-f0-9]\{64\}/\1$NEW_HASH/" "$ZONE_FILE"

  # Increment the serial (YYYYMMDDNN format)
  CURRENT_SERIAL=$(grep -oP '\d{10}' "$ZONE_FILE" | head -1)
  NEW_SERIAL=$((CURRENT_SERIAL + 1))
  sed -i "s/$CURRENT_SERIAL/$NEW_SERIAL/" "$ZONE_FILE"

  # Reload the zone
  rndc reload "$ZONE"

  echo "TLSA updated: $NEW_HASH"
else
  echo "TLSA hash unchanged, no update needed."
fi

# Reload Postfix to pick up the new certificate
postfix reload
Make the script executable:
chmod +x /etc/letsencrypt/renewal-hooks/deploy/update-tlsa.sh
Test the renewal
# Simulate a renewal (dry-run)
certbot renew --dry-run

# Force an actual renewal (to test the hook)
certbot renew --force-renewal
SPKI rollover strategy (key change)
If you need to regenerate the private key (compromise, migration, algorithm upgrade), you must publish the new TLSA before deploying the new certificate. RFC 7671 (section 8.1) calls this "pre-publication" and defines the safe rollover procedure:
- Generate the new key and compute its SPKI hash
- Publish both TLSA records in the zone (old + new)
- Wait for DNS propagation (2x TTL minimum)
- Deploy the new certificate
- Remove the old TLSA after propagation
; Dual TLSA during transition
_25._tcp.mail.captaindns.com. IN TLSA 3 1 1 <old-hash>
_25._tcp.mail.captaindns.com. IN TLSA 3 1 1 <new-hash>
Verify the configuration
Deploying without verifying is deploying blind. DANE errors are silent: you will not see bounced emails in your own logs, only the sender's logs will show the rejection. Run every check below before considering the deployment complete.
DNS verification
# Verify the TLSA
dig +short _25._tcp.mail.captaindns.com TLSA
# Expected: 3 1 1 <hash-64-chars>

# Verify DNSSEC
dig +dnssec _25._tcp.mail.captaindns.com TLSA | grep -c "RRSIG"
# Expected: >= 1
TLS verification
# Test TLS connection with TLSA verification
openssl s_client -connect mail.captaindns.com:25 -starttls smtp \
  -dane_tlsa_domain mail.captaindns.com \
  -dane_tlsa_rrdata "3 1 1 $(dig +short _25._tcp.mail.captaindns.com TLSA | awk '{print $4}')"
The output should show Verification: OK and DANE TLSA 3 1 1 matched EE certificate. If you see verify error, the SPKI hash in your TLSA does not match the certificate currently served by Postfix.
Outbound Postfix verification
Check that Postfix properly verifies DANE for outgoing emails:
# Send a test email and check the logs
echo "Test DANE" | mail -s "DANE test" test@gmail.com
grep "Verified TLS connection" /var/log/mail.log | tail -5
The logs should mention dane in the security level.
Online verification
Command-line checks confirm individual components. For a full end-to-end validation (DNSSEC chain, TLSA syntax, certificate match, and MX routing), use the CaptainDNS DANE/TLSA syntax checker and the DANE/TLSA inspector (linked in the summary above). These tools test your setup the same way a remote mail server would.
Step-by-step action plan
Set up DANE/TLSA with Postfix, Bind and Let's Encrypt
- Enable DNSSEC on the Bind9 zone
Configure
dnssec-policy defaultandinline-signing yesin the Bind9 zone. Publish the DS record at the registrar. Verify the chain of trust withdig +dnssec. - Obtain the Let's Encrypt certificate
Run
certbot certonly --standalone -d mail.captaindns.com --reuse-keyto obtain the certificate with private key reuse. - Configure Postfix for TLS and DANE
Edit
main.cfwith the certificate paths (smtpd_tls_*), enable outbound DANE verification (smtp_dns_support_level = dnssec,smtp_tls_security_level = dane). - Publish the TLSA in the DNS zone
Generate the SPKI SHA-256 hash with
openssl, add the record_25._tcp.mail.captaindns.com. IN TLSA 3 1 1 <hash>to the zone, reload withrndc reload. - Automate renewal
Create the deploy-hook
/etc/letsencrypt/renewal-hooks/deploy/update-tlsa.shthat compares SPKI hashes and updates the TLSA if needed. Test withcertbot renew --force-renewal. - Verify the deployment
Validate with
dig TLSA,openssl s_client -dane_tlsa_domain, Postfix logs and the CaptainDNS DANE/TLSA inspector.
FAQ
How do I generate a TLSA record for Let's Encrypt?
Use the command openssl x509 -in cert.pem -pubkey -noout | openssl pkey -pubin -outform DER | openssl dgst -sha256 -binary | xxd -p -c 64 to extract the SPKI SHA-256 hash. The 64-character hexadecimal result forms the TLSA data with parameters 3 1 1.
Do I need to update the TLSA on every Let's Encrypt renewal?
No, if you use --reuse-key with Certbot and the DANE-EE/SPKI combination (3 1 1). The SPKI hash depends on the public key, not the certificate. As long as the private key stays the same, the hash does not change. Set up a verification deploy-hook as a safety measure.
How do I enable DANE verification in Postfix?
Add smtp_dns_support_level = dnssec and smtp_tls_security_level = dane in /etc/postfix/main.cf. Postfix will automatically verify the TLSA records of recipient domains via DNSSEC. If the TLSA is missing or invalid, Postfix falls back to opportunistic TLS.
Does DANE work with self-signed certificates?
Yes. With DANE-EE (usage 3), the certificate is validated by the TLSA in DNS, not by a certificate authority. A self-signed certificate with a correct TLSA and a valid DNSSEC zone is accepted by servers that verify DANE.
How do I test that DANE is properly configured?
Three levels of verification: 1) dig +dnssec _25._tcp.mail.captaindns.com TLSA for DNS, 2) openssl s_client -connect mail.captaindns.com:25 -starttls smtp -dane_tlsa_domain for certificate/TLSA matching, 3) the CaptainDNS DANE/TLSA inspector for a full report including the DNSSEC chain.
Is Bind required or can I use another DNS server?
Bind9 is not required. Any DNS server that supports DNSSEC works: NSD, Knot DNS, PowerDNS. The principles are identical, only the configuration syntax differs. Bind9 is used in this tutorial because it is the most common on Linux servers and its inline-signing simplifies DNSSEC management.
What happens if the TLSA no longer matches the certificate?
Servers that verify DANE (like Postfix with dane or Gmail) will refuse to establish the TLS connection and fall back to unencrypted mode or reject the message depending on their policy. This is why dual TLSA publication during key rotations is essential. If your TLSA is out of sync, temporarily remove it to revert to opportunistic TLS while you fix the issue.
📚 Related DANE/TLSA guides
- DANE/TLSA: the complete guide to authenticating email certificates via DNS: how it works, TLSA anatomy, recommended use cases and comparison with MTA-STS
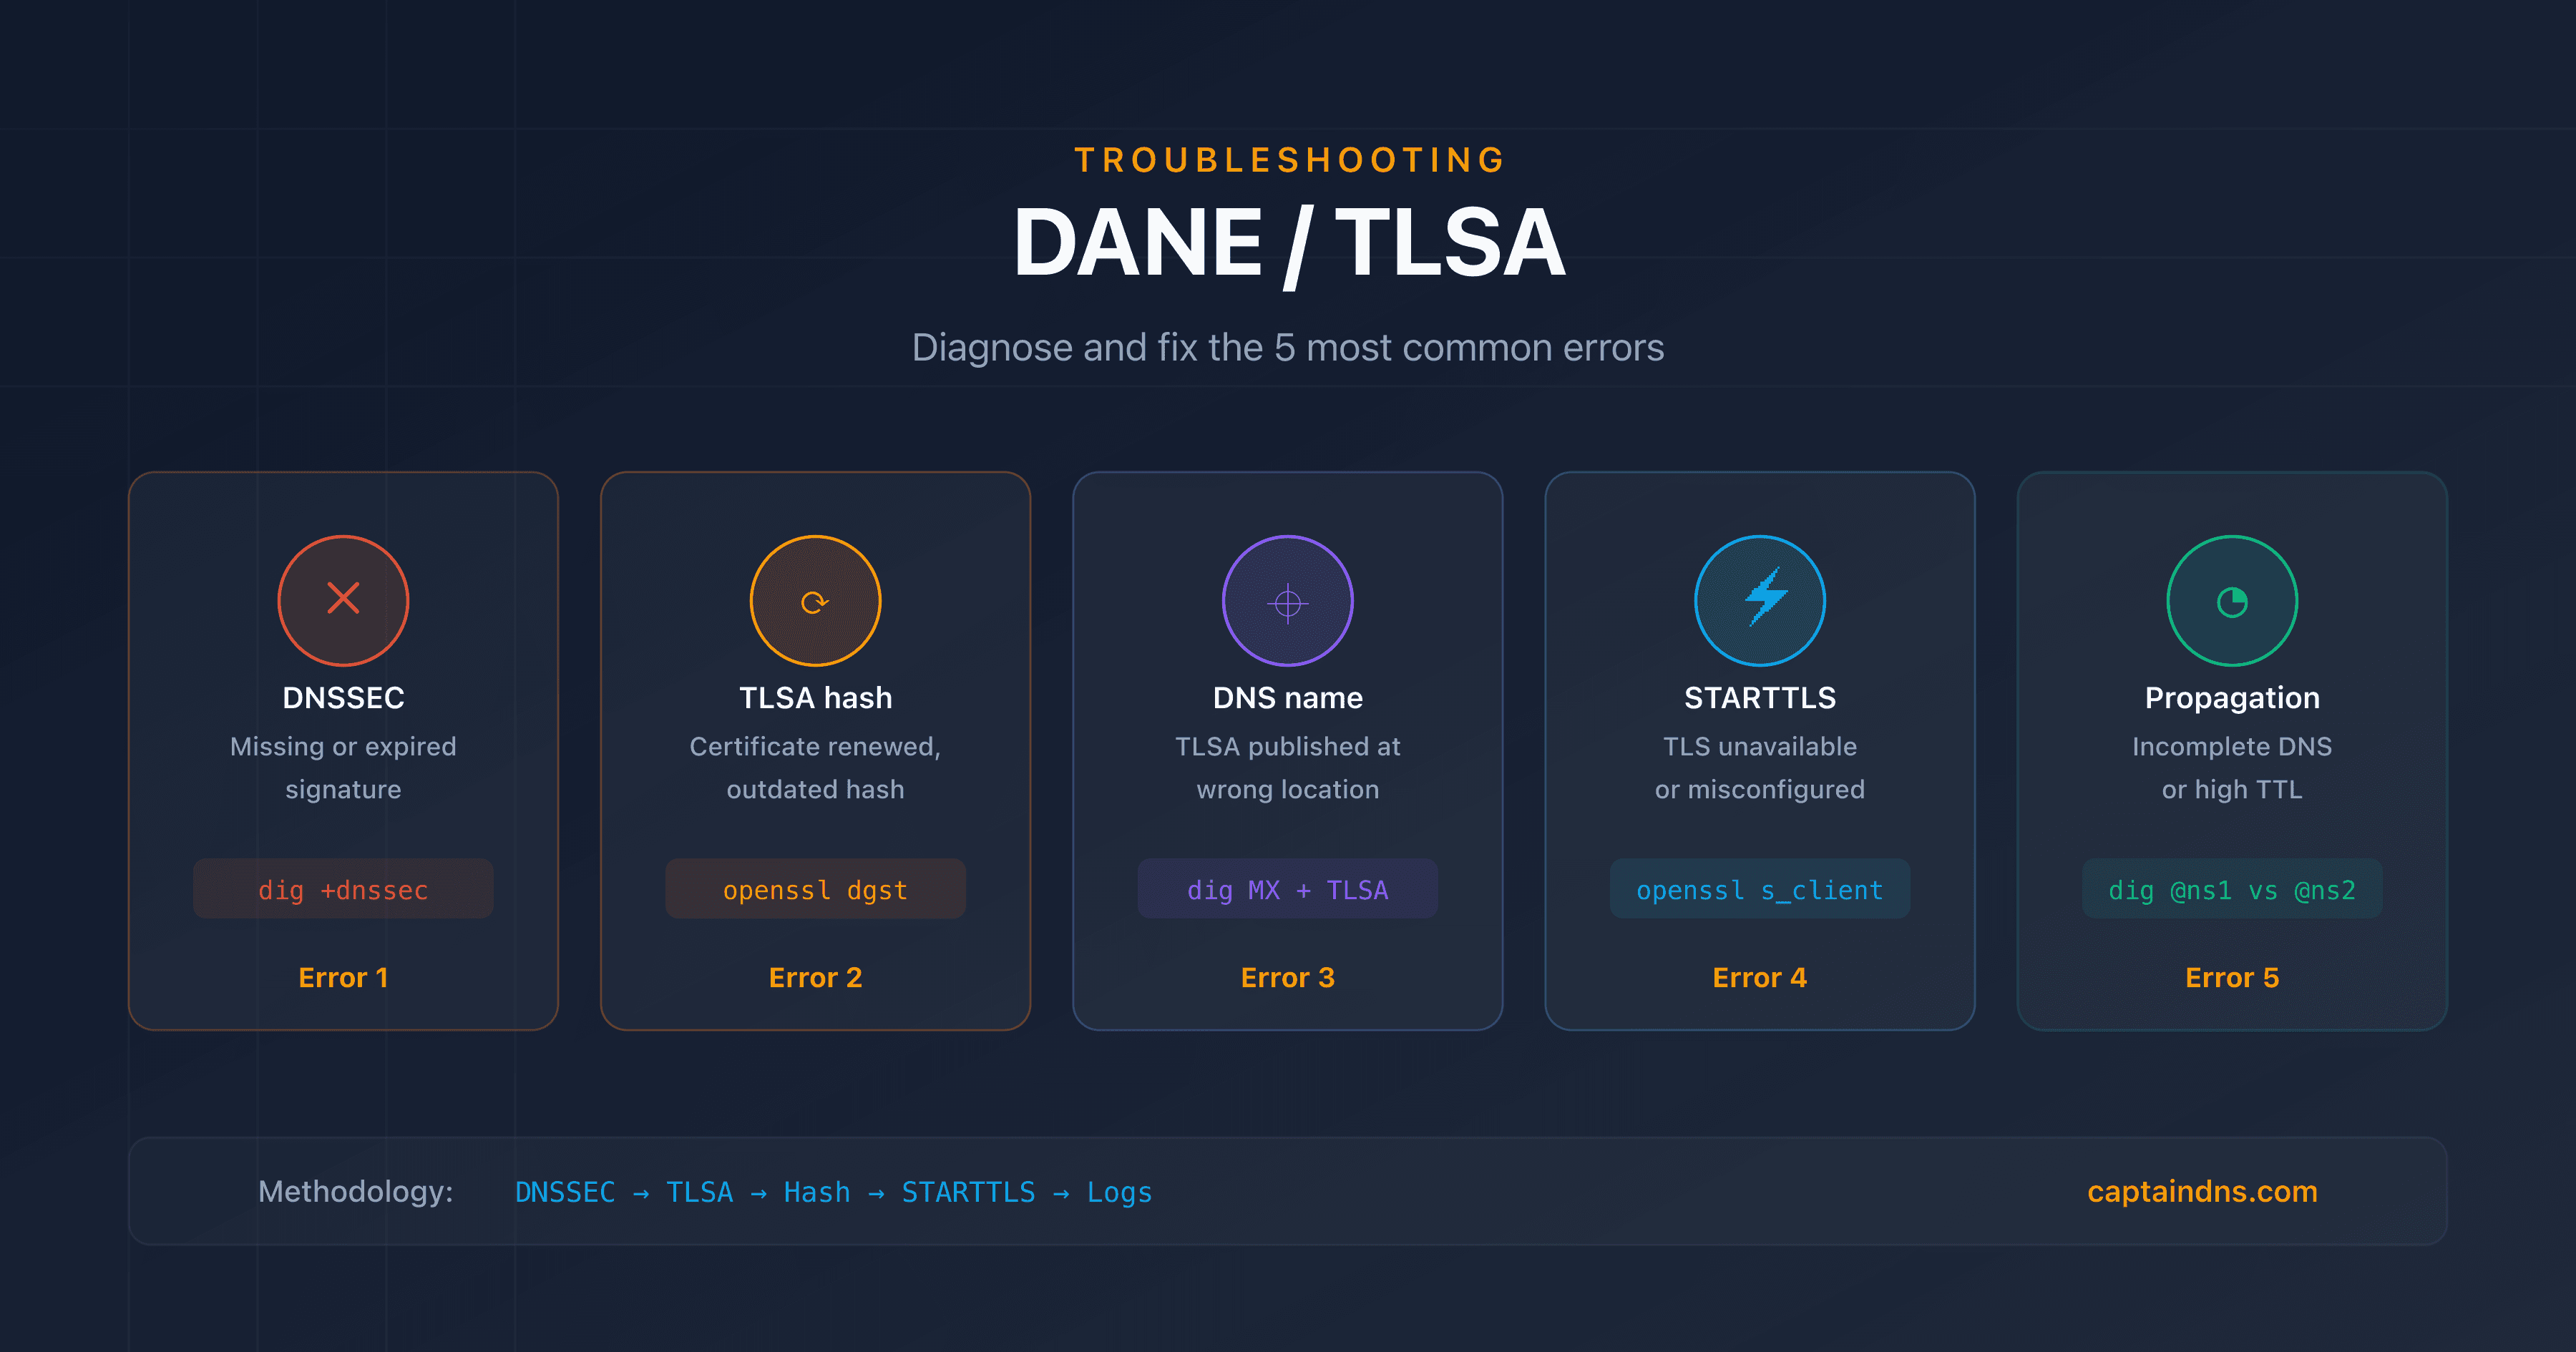
- DANE/TLSA troubleshooting: diagnose and fix common errors: 5-step diagnostic methodology, dig/openssl commands and TLS-RPT monitoring
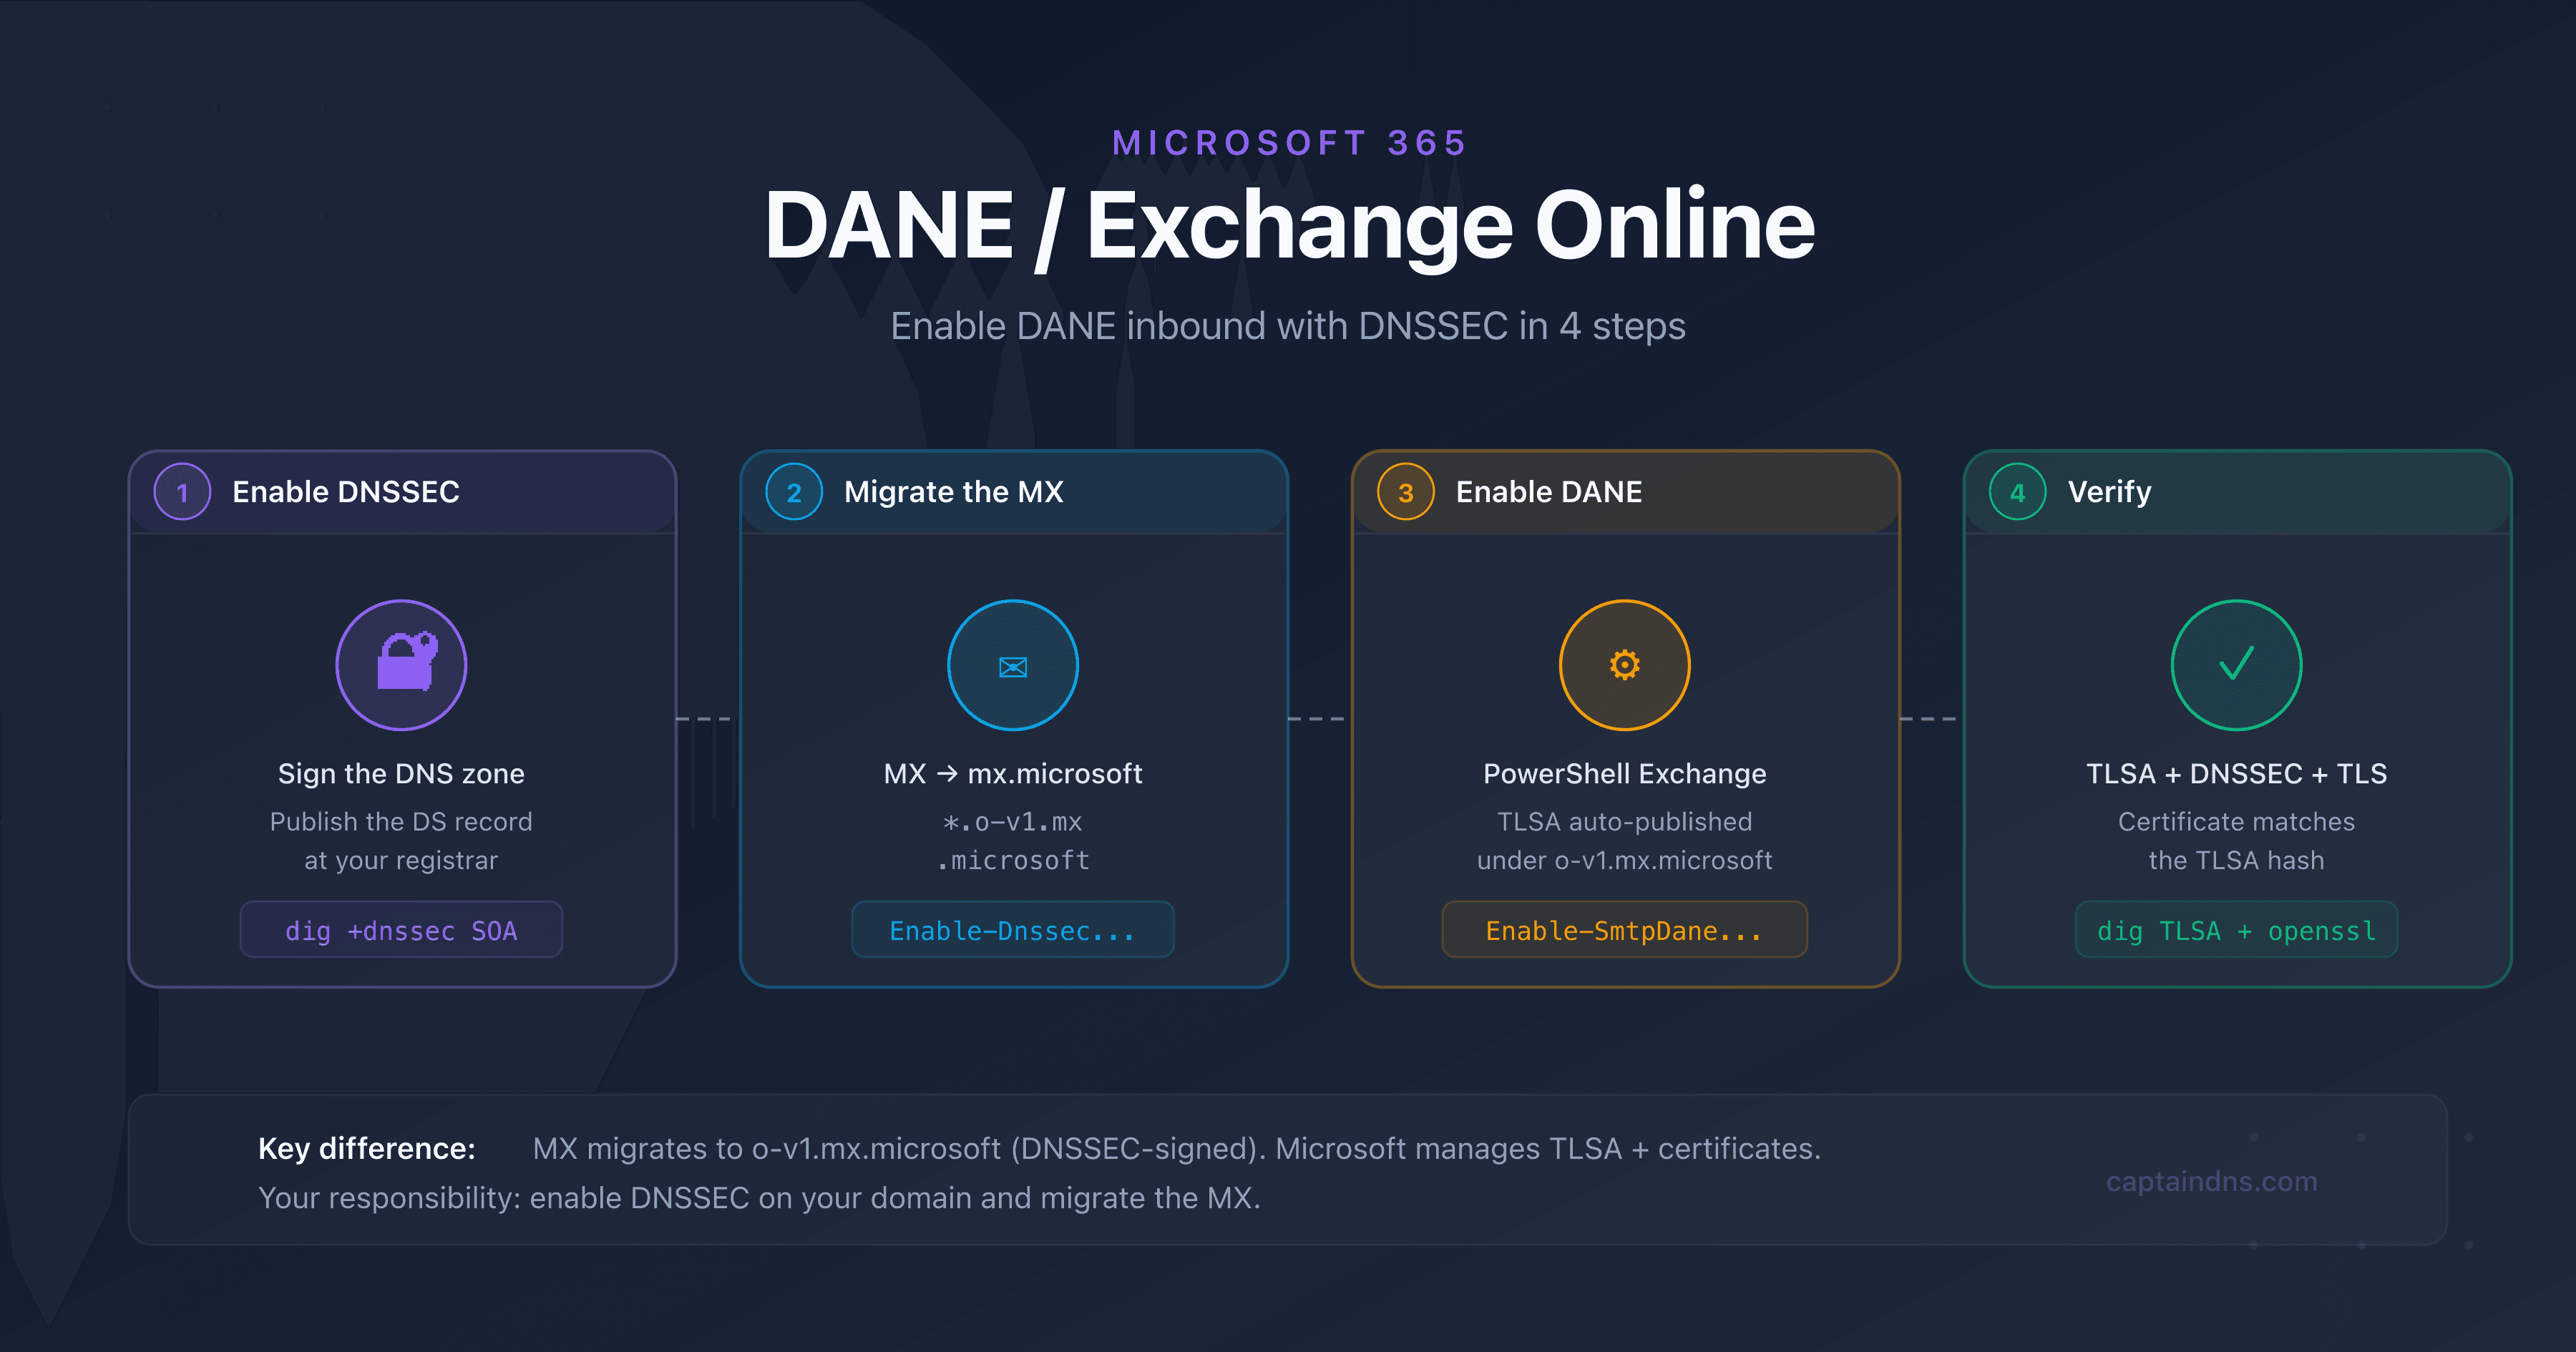
- Deploy DANE for Exchange Online and Microsoft 365